TRV Homepage | Walkthrough Home | Forums | Awards | Products
Copyright notice: If you want to copy this walkthrough for your own site, please ask permission BEFORE you do so and place the following code on your site at the top of each walkthrough page:
Hint: When you find yourself trapped by a boulder in any level of the game, try standing as close to it as possible and to the side, and side flipping to see if you can get over it that way...sometimes this works for my daughter, but I've never been able to do it, yet! :-(
In this level, you need to find your weapons, three fuses and a key.
Swim forward until you can surface in an underground lake. Looking around you can see a couple of ledges to the left with barrels and crates, and a waterfall to the right. Swim under the waterfall, surface and find a lever down the passage and on the left of the wider area. Pull it to open a gate somewhere before swimming back to the lake.
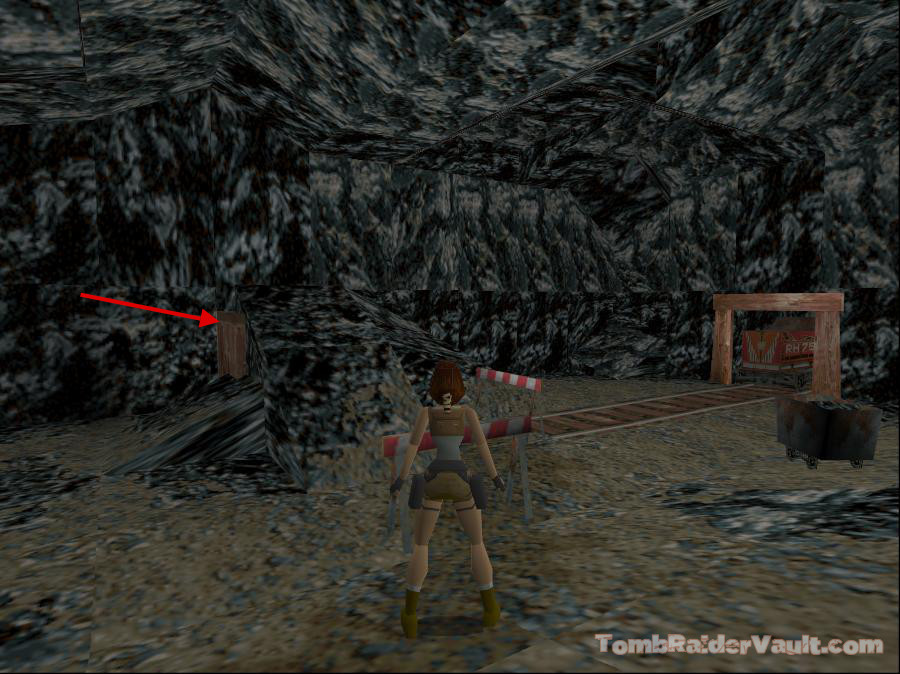
Climb out on the ledge with the barrels and crates and follow the passage until you come to a mining car blocking another tunnel entrance, and a moveable crate (screenshot). Pull it out and climb over it to find the gate you just opened, and pull the lever you find there to open another gate. Return to the lake, jump in and swim under the waterfall again. Past the first lever is another gate, the one you just opened. Go through it to come to a ledge above the lake. Run and jump across to the ledge with the barricades and continue on until you reach a room with a glass-walled room and a small building hanging from the ceiling! As you pass it, Lara looks up toward it. There is a large medipack on the floor in the cave.
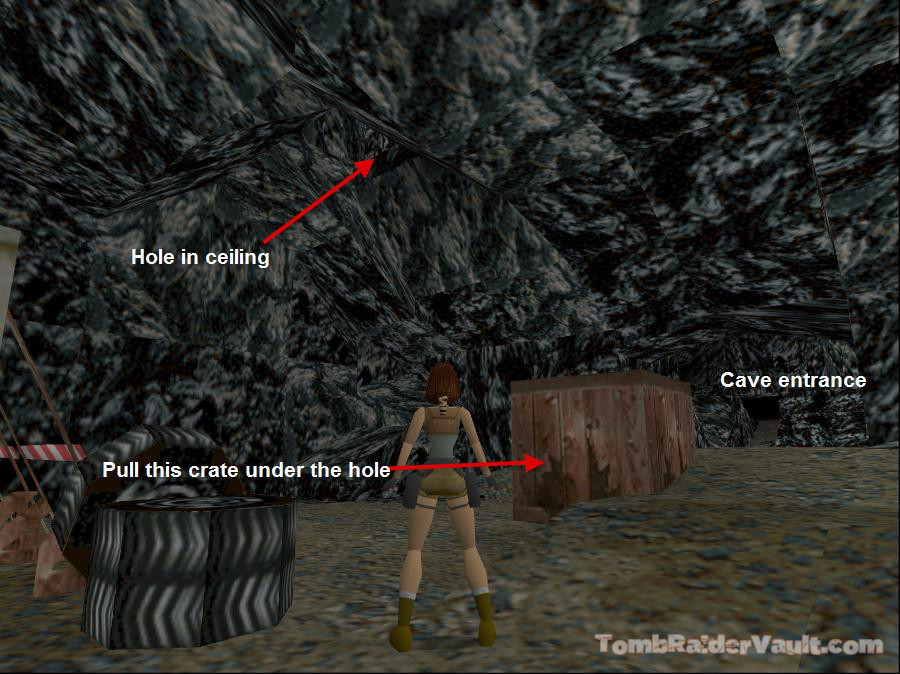
In the glass-walled room are three places for fuses to fit into, some Magnum clips, and a save crystal which you can use if you wish. Opposite the entrance you just came through is an opening. Go through to find yourself in an area with several objects including a moveable crate, some tyres, a gate and an opening to the left. Move the crate toward the building until it's directly underneath an opening in the ceiling of the cave (screenshot ). Climb up and run and jump over to the nearest building and drop down through the broken area of the roof and continue until you reach another lever. When you pull it, a boat on the lake moves toward a ledge. Continue on until you reach the opening above the crate you just moved...if the crate wasn't positioned beneath the opening, Lara would take some damage!
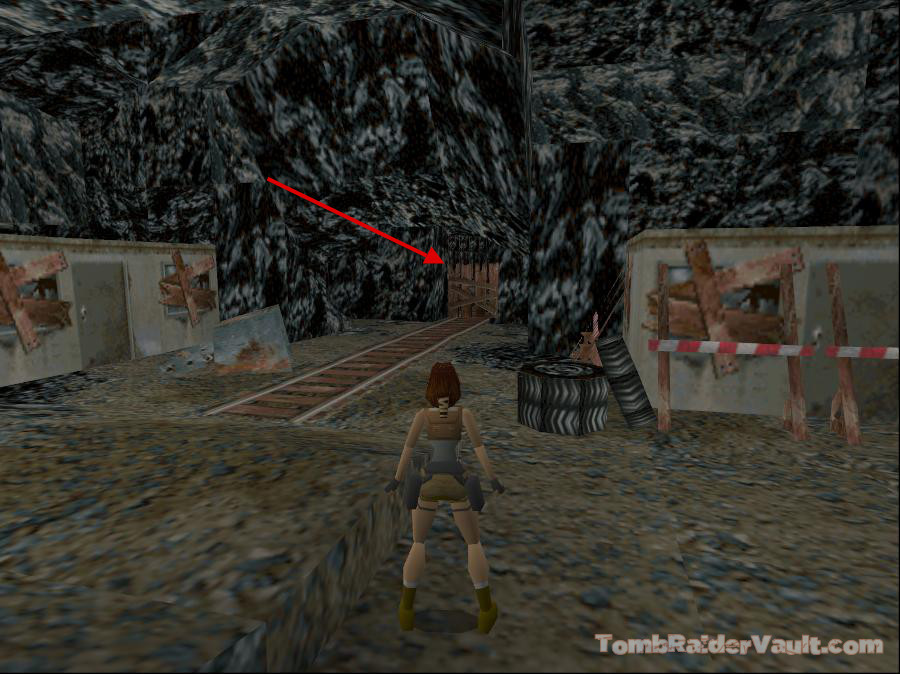
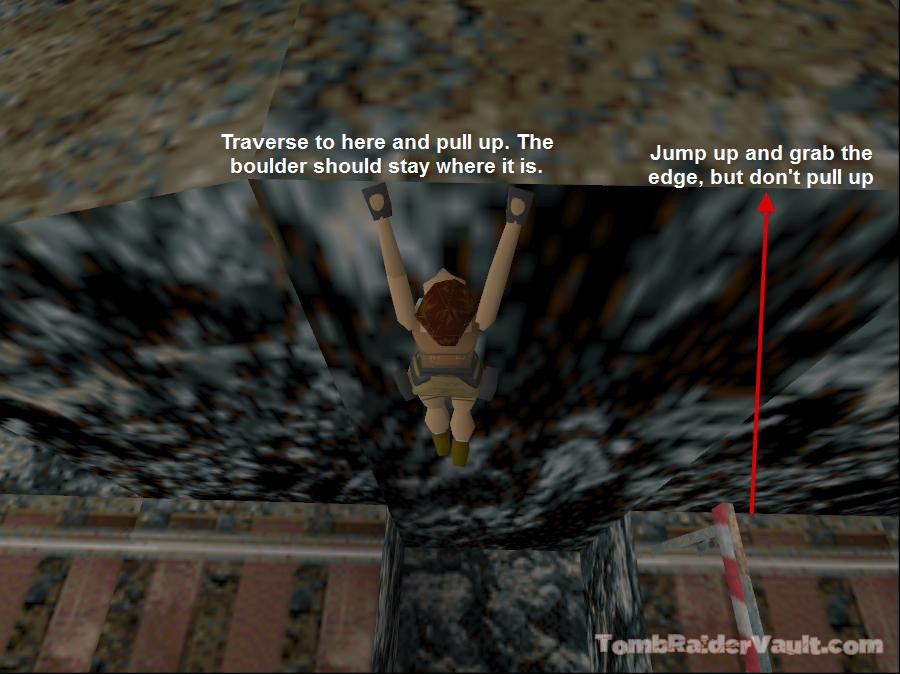
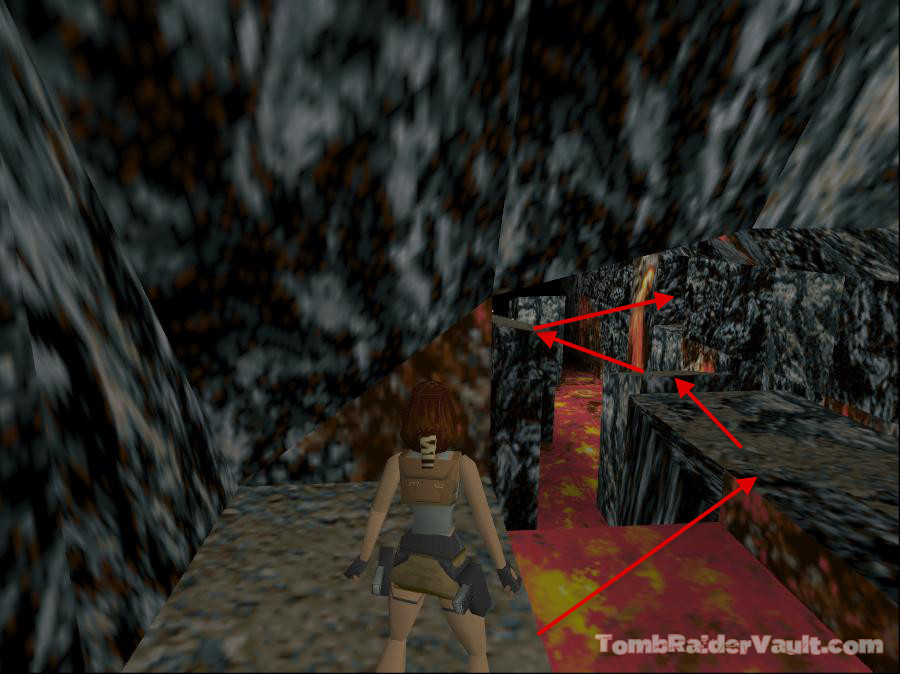
Now for a tricky boulder-trap! Approach the gate set between the two buildings (screenshot ). As you near, it opens and you come to an area with some mine tracks, barricades and the boulder-trap. Move forward toward the first barricade to trigger the first boulder from the side. Step back and turn right to grab the ledge beside the mine track. Shimmy left until you reach the part of the ledge that starts to slope down before you pull up (screenshot). Turn left, continue, jump over the gap, walk through the tunnel at end to find the first fuse and a save crystal. This is tricky, but if you make a mistake and trigger the second boulder, which will cut off the way you need to go, and you need to do it again, follow the tunnel you can find at the top of the second boulder slope, make your way back and start again as everything resets when you go back through the gate.
Walk up the ramp and forward to the left slope then jump back to avoid another boulder. Turn to face left, with the boulder behind and to the right, then flip right then back left..(hopefully you will avoid the next boulder as it starts to roll when you flipped to the right!). Walk up the ramp to the opening in the floor and drop down. Walk toward the crossroad, the turn right. The boulder above will now roll down the ramp, so you can now climb up to where it was, turn left and follow the passage to an opening in the floor. Drop down, go up the boulder ramp once it's rolled past, and return to the lake through the room with the hanging building.
Swim across the lake and climb up onto the boat that moved when you pulled the last lever, then run and jump over to the smaller ledge with the boxes that you couldn't reach before. Climb up and over the box to the left to find a small room filled with crates bearing the legend 'Natla Technologies'. In the alcove are some Magnum clips.. pick them up then find the moveable crate and pull it toward you. Now go round and push it into the alcove where the ammo was. Now you'll see another moveable block..pull it twice, then go to it's right and pull it again to reveal an opening. Enter and pull the switch to move the mining cart that was blocking the tunnel you entered near the start of the level.
Return and swim left to the next ledge to the area you just cleared of the mining cart. Go through the now accessible tunnel and push the moveable box twice. Go around it and WALK to the entrance to pick up the second fuse you can see lying there...if you go any further, you'll be sorry! There's a hostile cowboy just waiting for you to run in! Go back to the box you just moved and climb up and into the opening above. Pick up the Uzi clips and pull the lever to open another gate to a conveyor belt and another fuse.
Go back to the lake and under the waterfall, past the room with the hanging building and back to the room with the tyres and other objects. Just past the tyres is an opening to the left...go through it and follow the passage, through the now open gate where you'll find more Uzi clips and another lever. Pull it to start the conveyor belt moving to deposit the third fuse on the floor which you can now retrieve. Now you have all three fuses which can be fitted into their appropriate places in the glass-walled room! This lowers the hanging building inside of which you can find your pistols! (Hooray!) Note: You may have to select them from the inventory before you can draw them!
Once you have your pistols, climb on top of the building then run, jump and grab the opening in the wall beyond. A few steps in to the passage, look to the right and up and you should see an opening in the wall. Climb into it and continue until you reach another slope. This has a lava pit underneath a trapdoor which will open as soon as you begin sliding down the slope. Slide down backwards, pressing action to grab the edge at the end. As you pull up, a trapdoor behind you will close, so you can stand on it and climb onto the right ledge and drop down to the room ahead. This is the first secret of the level...more Uzi clips and a large medipack. Pull the lever and go through the door it opens, drop down onto the trapdoor, jump up the slope, follow the tunnel to reach a save crystal on a ledge above the lake. Save your game, swim across and climb out onto the ledge with the barrels again.
Remember the cave past the mine cart where you picked up the ammo from the entrance? There's a nasty cowboy inside waiting for you, which is why you didn't enter earlier without your pistols! As you enter the cave with the cowboy, he starts taunting you before emerging from the right with some Magnums. You can stay within the doorway, jumping back and forward until he's dead, or you can try running and jumping about the room he's in, but minding the lava pits! Now you can take his Magnums and feel like you are REALLY armed!
At the edge of the room and below is a river of lava...go to the right and look down to see a small, square ledge with a save crystal. Do a safety drop onto it and save your game. To get to the ledge below, drop and hang from the one you are on, drop again and press action immediately to grab the one beneath. Pull up and pick up the small medipack. Grab the crevice in the wall and shimmy right to the end and drop down to the rock below. Walk around the left corner and grab the crevice in that wall and shimmy along to drop onto another ledge. Turn right to face a wall with a ledge above another crevice...run, jump and grab the ledge, then drop and press action to grab the crevice below. Shimmy right and drop down.
Continue along until you come to a slope. Slide down and turn right to come out near the river of lava. There's a block in the middle of the lava-fall...jump to it, then take a series of running jumps* to the block in front of an opening in the cave wall (screenshot) where there's a moveable block and another boulder trap. Run and jump into the cave. You need to run forward to the block and push it forward quickly to avoid it, then enter the room behind. Pull the crate to the side to reveal an opening above that leads you to the second secret. Pull up into the opening and turn around and jump over into the small cave. Pick up the a large medipack and Uzi clips then jump over the hole in the floor and follow the passage. Drop down and follow the boulder-tracks to find Uzi clips, a large medipack and the shotgun.
Return back the way you came to the small cave where the secret was and drop down the opening on the right of the cave to the other side of the boulder. Stand in the doorway, then take a running jump over to the tall pillar in the lava, then do a few more running jumps to get over to the other side of the lava river from where you entered, drop down and go through the doorway there. Slide down the sloping path to land on a small ledge. Walk to the edge then do a standing jump and grab to the opposite edge. Continue on to find yourself in a cave with several boxes marked 'TNT'.
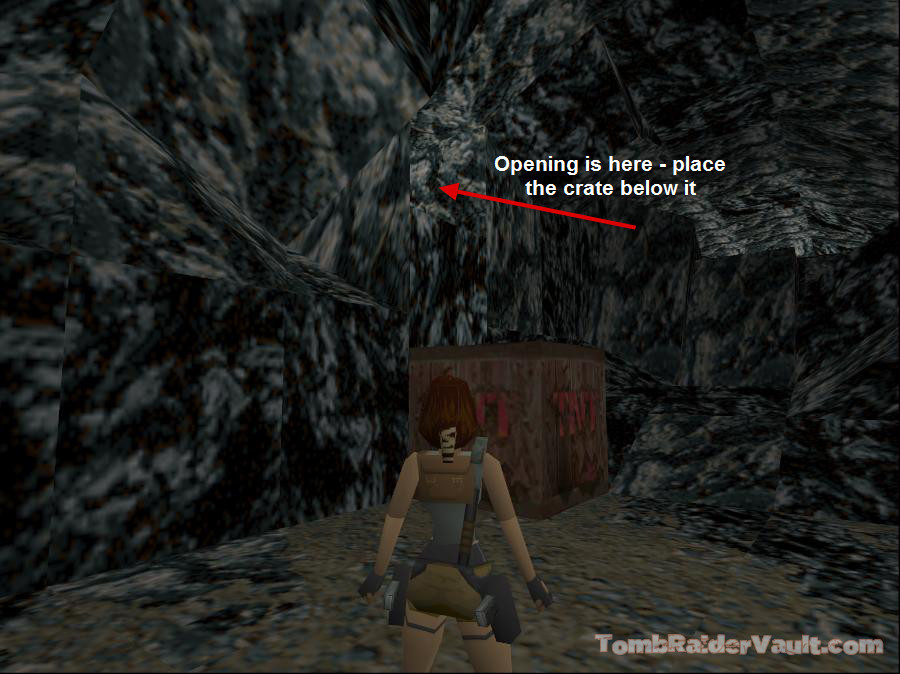
There's a moveable box in the far-right corner, slightly darker than the rest. You need to move this through the doorway into the next room and directly under the opening high up on the left wall (screenshot ). Climb up and jump to grab the opening, pull up and go up the slope, using the save crystal on the way. Climb up the rocks and take a running jump over to one of the ledges above the lava pit. Stay there for a bit, as a boulder will come hurtling past! Run and jump over to the other side of the pit and follow the passage to come out at the other side of the lava river from where you battled with the cowboy earlier!
Follow the ledge all the way up to the lever on the right, pick up some ammo and pull the lever to blow some of the TNT boxes in the last room. Make your way back, slide down the slope and return back to the room where you placed the TNT box. When you set off the explosives, it brought down one of the walls. Climb over the rubble and get ready to tackle a marauding skateboarder! You're mad at him because he's firing at you with YOUR Uzis! Advance slowly into the room, wait until Lara aims, then jump back and forth firing as you do so, keeping a close eye on Lara's health. Once he's dead, take back your weapons.
At the entrance where you came in, turn left, walk, then run and jump across the lava and pick up some Uzi clips, turn right and walk forward until you come to a pit filled with water. Jump in and swim through the automatic gate to retrieve the third secret...a small medipack, a large medipack and some Uzi clips. Swim back as though you were returning, but if you look past the doorway and up, there's an opening in the ceiling. Swim up and climb out, follow the passage to find yourself above the room where you shot the skateboarder. Drop down and pick up all the ammo you can find...make sure you look around carefully as there are two lots of Uzi clips! Leave via the exit at the top of the ramps, where you'll find another save crystal on the way.
Ahead of you and to the right, you'll see a ramp with three boulders at the top. To set them all rolling safely, walk up the CENTER of the slope, flip right when the first boulder is released, then flip left to avoid the second, and back to the right to avoid the last one. Walk to the top of the ramp, avoiding another boulder that rolls down the passage ahead from the left, then turn left to where it rolled down from. Keep going, turn left and pull up to find yourself in a large cave with lots of ledges and blocks. Find the climbable block and climb up, then do a series of jump and grabs to the one below the opening above, and climb up.
In this room, you'll have to perform fairly complicated sequences of pushing and pulling the various blocks to reach levers to open various doors. As you are standing in the opening to the room, there's a moveable block that can be pushed twice into the next room. To the right of that is an opening in the ceiling. Climb up above to find another block which you have to pull once, then go around and push once to reveal an opening. Go through it to a room with a gold door and an opening in the floor. Drop down and pull the block you find there once. Climb back through the ceiling, through the next room and back down through the opening in the floor. Go back to the first block you pushed and push it once more to reveal an alcove with a lever and a gold door. Pull the lever and use the save crystal. The lever you just used opens the gold door in the room above, so return back there through the ceiling. Enter through the gold door and turn right, continuing to a left turn where you'll see some steps and another block. Go down and push it once. Beyond is a passage with several alcoves and another gold door at the end. The door can be opened by treading on a certain spot on the floor, but instead, go to the last alcove and pull the lever there to open the first gold door where the save crystal was. Return back there and go through the door you just opened.
You now find yourself outside near the pyramid, but there's bad guy with a shotgun waiting for you! Draw weapons and run past him if you can as it's easier to shoot him in the open area as you can jump around while you do so! Because he's got a shotgun, be prepared to take some damage and make sure you have enough medipacks in case he nicks you! When he's gone take the shotgun (or just shells if you already have it) and walk down to the pyramid.
Climb up onto the ledge above the door and do a series of jumps up the side where the flat ledges are on the left. At the top, jump to the left to slide down the side of the pyramid to land in front of a cave entrance. Inside is a lever that opens two gold doors back where the baddie with the shotgun was. Slide down to the ground and return to that area, and enter the gold door on the right. Here you'll find some more Uzi clips and a large medipack, and a bit farther in, the pyramid key . Pick it up, take it to the door of the pyramid and use it to exit the level.
*Only jump to the blocks with the sandy-coloured tops.
If you missed anything while playing the PC version, here is the savegame file with all kills, pickups and secrets.
{ Previous Level } { Next Level }
Send us feedback about this wakthrough