TRV Homepage | Walkthrough Home | Forums | Awards | Products
Copyright notice: If you want to copy this walkthrough for your own site, please ask permission BEFORE you do so and place the following code on your site at the top of each walkthrough page:
Here you'll find 4 keys and another piece of the scion and have the final showdown with the tenacious Pierre!
Keep swimming forward and down. When you reach the bottom where the silver grate is, turn around and swim toward a lever inside an alcove. This lowers the water level, so pull this then turn around and swim back up to the surface before climbing out and pulling the switch on the wall. This opens a door to the right, which you now proceed through, drawing weapons for a croc!
In this room, you can see a movable block, but you can't pull or push this...it needs to be raised up instead. Climb to the top of the moss-covered steps and drop down the other side. Run and jump over to the green ledge, and from it, climb up the right side of the block at the top of the room, but be careful of the wall darts that start flying past the block! From the right corner, take a running jump over to the next ledge, then another one to the ledge across from the dart-trap. In the alcove is a lever that raises the water level. You need to do this to raise the movable block down below.
Beneath the block that is now raised, there is a small medipack. Retrieve this before climbing onto the block and entering the passageway. When you reach the next opening, you need to swim forward and all the way down until you reach a silver grate and then another lever...pull this to lower the water level once again. Once the water level is lowered, the current is much faster. Swim back up to take a breath of air, then swim back down and forward along a very long tunnel...with the water current now much faster, you will be swept along until you can surface in a room ahead.
Climb out, draw weapons and dispatch another giant rat! Find the movable block and pull it out once so you can climb up it and onto the ledge above. Make your way to the save crystal and save your game now if you wish, or later as you will be coming back here!
Notice the two doorways slightly above...Pierre is lurking inside, so make your way across to the square block near the door on the right, then jump and grab across to enter that door. Use your pistols to see off Pierre by trying to get behind him as you shoot to let him run out of the door, or taking a few shots then retreating back to the doorway once or twice.¹
Once he's gone, walk down the passageway...hear that ominous clanging? That's the dreaded jagged metal doors! Remember how to tackle these? Walk as close to them as you can, using the look button and looking down at your feet to see how far away you are. Once you are close enough, wait for the second clang as the doors shut together, then roll to get through. You can also press forward once to jump through.
As you continue down the stairs, you'll probably hear the muted grunts of another croc...deal with it before heading into the room to pick up the goodies you find down there: two lots of shotgun shells and one set of Magnum clips. Look closely at the floor for three squares that look slightly different from the rest (in each corner of the room)...if you stand on these in any order, it opens a secret door in the corner of the room. Inside you'll find the level's first secret, but it's a bit of a pain to reach! Inside the room is a ledge up above, where the actual secret is. There's a ramp and three angled blocks. Stand with your back to the ramp, against the lowest block, then flip backwards. Keep hold of the jump button until Lara performs her acrobatics and eventually lands on the ledge (or you may have to grab the ledge) to retrieve a large medipack and some shotgun shells.
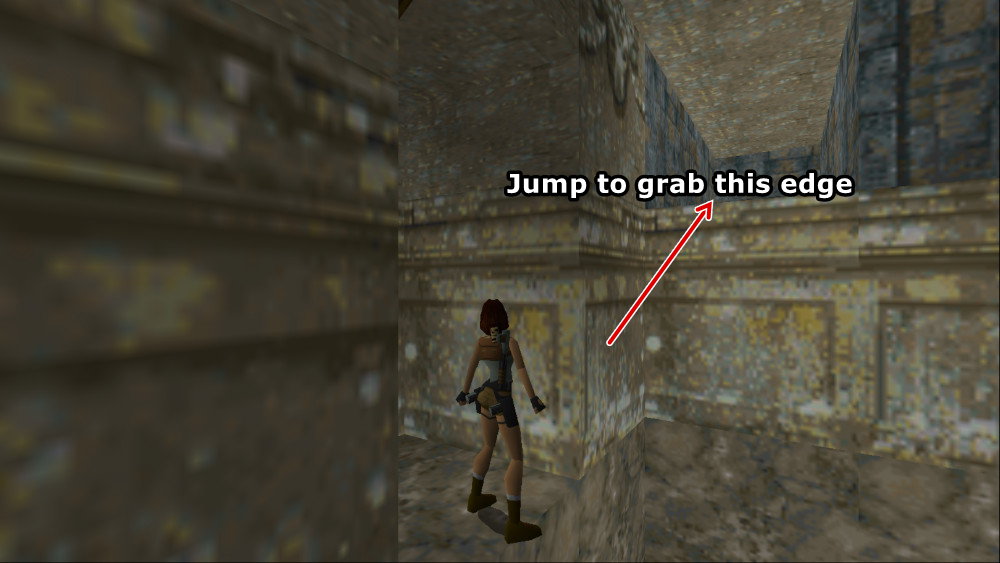
Drop back down, climb the stairs you just came from, carefully past the jagged, clanging doors and back into the main pool room. Take a step back from the entrance doorway and jump forward, down onto the block beneath the door and notice the shotgun shells across in the alcove near the large blade. Run, jump and grab the edge of the alcove and pull yourself up to retrieve them before proceeding to the next doorway. You can reach the second doorway from here by positioning yourself at a slight angle and jumping to grab the edge (screenshot).
If you didn't save your game earlier you'll have to do it now, but to get back you'll have to stand to the right of the ledge, facing the blade, then as soon as it begins to swing away to the left, take a run, jump and grab over to the doorway.
Follow the passageway until you come to a hole above a moss-covered room. Turn so your back is toward the ledge, drop and grab the ledge and shimmy along until you can pull up to a small passage with a lever...pull this to flood the moss-covered room. Drop into the water and surface immediately. Swim to the rectangular opening at the end of the water passage and climb out, drawing pistols for another rat.
Proceed to the end of the passage and jump into the water, swimming down then up and through a winding passageway until you come to a room with spikes on the floor. Climb out and draw weapons for a lion. Find the U-shaped passageway with the lever and pull it to open a door to a small room above, which also contains a couple of gorillas. Return to the main room and climb up to the save crystal to save your game. From there, you should be able to kill the apes with your pistols.
Jump over to grab the doorway where the apes were and pull yourself up, and walk to the edge, being careful not to fall off onto the spikes below! Jump over to grab the crevice near the door and shimmy right to pull yourself into the room to retrieve a large medipack and a gold key. Jump over the spikes back down to the main room.
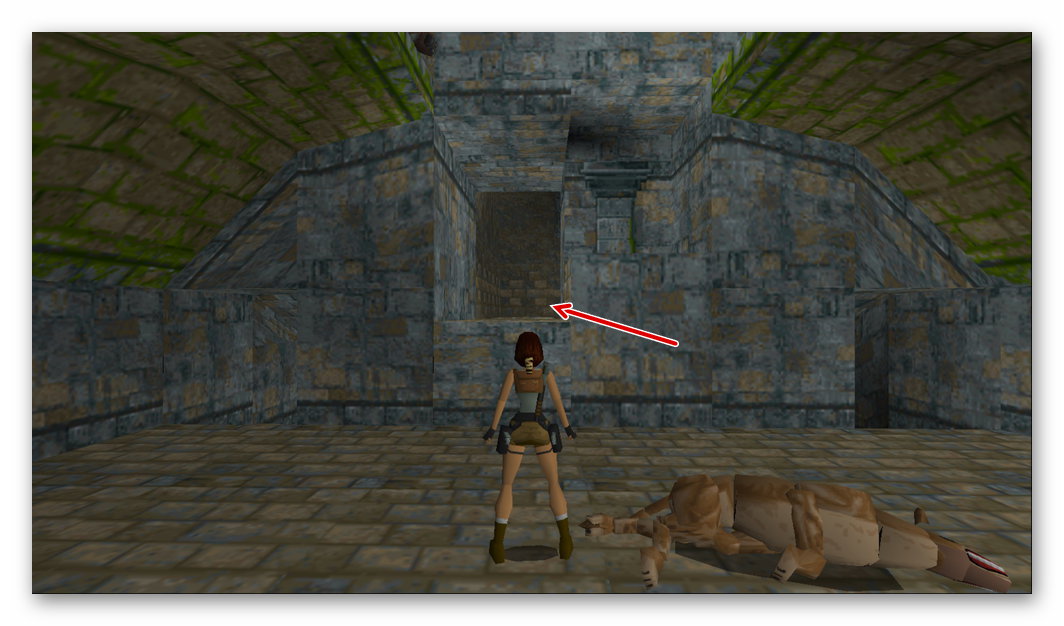
Climb through the alcove (screenshot) and look in the pool room to find the gold keyhole. Use the key to raise the blocks in the pool. Run and jump over each block, then jump over to the door, retrieving the small medipack on the right before entering.
Now you'll find yourself in a room with several locked doors and movable blocks. Notice also the door higher up the wall, forward and to the left of the entrance. There are four pressure pads on the floor to the left, that open various doors once a movable block is pulled/pushed onto them. You can do these in any order, but there's usually something nasty inside of each door, so as soon as you have placed a block on a pressure pad, climb up it and draw pistols! The movable block is tucked between two pillars. The door set up in the wall can be reached by jumping from the block, but there's another set of jagged, clanging doors which you need to negotiate carefully!
In these rooms you'll find various goodies and two rusty keys to open the door with the two keyholes next to it. You don't have to do all of them unless you want all of the pickups and kills. Behind one of the doors is a boulder-trap, so enter carefully then run and jump across to the alcove to retrieve one of the keys...the boulders should pass by harmlessly!
I usually do them in this order:
1) Pull the block twice onto the first pressure pad. Jump up onto it and draw weapons for an angry gorilla that comes from the door that opens, near the room entrance. Inside the room are some shotgun shells and Magnum clips.
2) Push the block onto the pressure pad nearest the door high up on the wall. Jump and grab over to it then proceed carefully. Jump or roll through the jagged doors as they are opening to get through. Pick up the first rusty key and the large medipack inside the room. Get back carefully through the doors and proceed with caution as there may be another gorilla waiting for you down below!
3) Pull the block back twice onto the next pressure pad to open another door and release four rats. Get rid of them from the top of the block then enter the room they came from to pick up the small medipack in there. For some reason, the fourth rat didn't appear until I'd exited this room...what a fright! :-(
4) Pull the block on the last pressure pad. The next door contains a boulder trap. Ignore the small medipack on the floor, run past it and into the alcove with the second rusty key. The boulders should then roll past so you can pick up the key and the medipack in peace.
These keys can now be used to open the door into the next area. However, to the right of the locked door is another door that is now open. Go in to pick up the shotgun shells before continuing.
Open the door with the rusty keys, and use the save crystal. Okay, now for the level's second secret...which seem to get harder and harder to retrieve, don't you think? (Alternative method below.) Before you slide down the long ramp, stand to the right of the doorway, facing the ramp and turn slightly to the left. Jump forward, keeping hold of the jump key as Lara jumps around the rocks, to eventually land in a doorway. Ahead is a room with five cracked floor tiles and an alcove at the opposite end.
Stand facing forward in the middle of the doorway, standing almost at the edge. Keeping your finger on the jump button, jump forward, left, forward, forward, right, forward...if you've done this right, Lara should land in the alcove to retrieve the fabulous goodies, Magnum clips and Uzis clips! You won't be harmed if you do fall, but if you want to have another try for the secret, you'll have to load in the game again.
Alternative Method
However, the above method is long-winded and difficult. If you want a quick and easy way to get this secret, simply stand at the entrance as far to the right wall as you can, hop back, then jump and grab the first floor tile. Pull up, run and jump and grab to the floor before the alcove, pull up and run into the alcove to pick up the secret. Much simpler. The floors won't break away until you pull up onto them.
Watch this (video) to see both methods.
Now you can drop down and climb out of the room to slide down to land in a lake. There's a croc here, so don't dawdle! Swim forward until you come to a small gray platform. Climb out and deal with the croc before entering the passageway behind.
Climb up the rocks until you reach a high gap, over which you'll see a switch. To get to it, you'll have to climb the block with slopes at either side, slide down the back, facing backwards, and press action to grab the edge. Climb back up and immediately press jump to back-flip to the ledge behind. Climb up to flip the switch to open an underwater door elsewhere (video). You can also just slide forwards down the slope and jump forward to grab the ledge ahead. Jump into the water below, turn around and swim to the right and through a winding tunnel. This brings you out at the other side of the lake where you'll see dry land and a temple with two centaur statues at either side. You'll also see a save crystal to the left, but don't climb out yet. Still in the water, face the centaur on the right of the door and swim down, then ahead and slightly to the left, and you'll see a small opening (screenshot). It's difficult to spot, so look carefully. Through the opening is a passage leading to the door you opened from above...swim through, surface, pull the lever and use the save crystal you find there.
Swim back to the temple and climb out on the LEFT side, to where the save crystal is. You can either save your game now or wait until you've battled the centaurs. If you're not bothered about all the kills, you can just save your game and run into the temple as the centaur on the left comes to life, which it does when you approach the temple doors! If you want to battle it, approach carefully, then back-flip out of the way, shooting constantly, jumping out of the way when it fires it's fireballs; it's actually not too difficult. Once it's gone, save the game and enter the building and turn left. (You can avoid fighting with these altogether as they don't actually follow you into the temple, so you can just run past them and hope for the best.)
Okay, now we come to the final showdown with Pierre (at long last!). He's waiting inside for you, so draw your Magnums and keep moving while you shoot! Once he's down, relieve him of his Magnums (which only count as a pick-up...you don't actually end up with them unless you haven't picked them up earlier), the gold key and the second piece of the scion.²
If you were too much of a wuss to take on the centaurs outside, you may be able to get them from the doorway, but the fireballs they shoot out are lethal and have a wide range! You can hear them clip-clopping around but you are safe as long as you don't go near the doorway. If you managed to take out one, the other will come to life as you proceed to the outer door. I find it's easier to run outside and do battle there as there's much more space to move around.
Back inside the building, you can climb up to the ledge around the top of the room by using the blocks on the ground. Up there you'll find 2 sets of Magnum clips and another large medipack on the balconies at either side of the room. Still up there, use the gold key in the lock you find and drop down to enter the door that opens...This is the door to Tihocan's Tomb and the end of the level.
Now you'll see a clip of Lara reading the hieroglyphics on the wall, giving you a little info on who Tihocan was.
¹Interesting note: Once when I was making my way up the blocks and ledges I fell back down to the ground. When I started making my way back up, Pierre was already there and firing. I managed to take a few pot-shots at him and see him off without having to try and fight him in a small passageway.
²Please note there is a bug in the PlayStation game. If you don't pick up the stuff Pierre drops before you save the game, once you re-load, the items will be gone, leaving you without a way to end the level. Pick up the items, then save your game.
If you missed anything while playing the PC version, here is the savegame file with all kills, pickups and secrets.
{ Previous Level } { Next Level }
Send us feedback about this wakthrough