TRV Homepage | Walkthrough Home | Forums | Awards | Products
Copyright notice: If you want to copy this walkthrough for your own site, please ask permission BEFORE you do so and place the following code on your site at the top of each walkthrough page:
Here you'll find two sapphire keys - one to enter the second part of the level, and one for the level-exit.
First is another clip - in this you find out about the scion and what happened to smash it into three pieces that each end up in different parts of the earth. One part ended up (where else?) in Egypt, so enters Lara biking across the desert in search of it!
At the start of the level walk forward toward the pit, turn around, and drop and hang from the ledge, then again to the crevice below. Shimmy right, drop, and pull the lever. Enter the door that opens below, pull out the movable block three times, then retrieve the goodies from behind it: a small medipack and some Magnum clips. There's another movable block in the alcove above. Climb out of the trench and pull the second block once. Climb onto the first block and pull the second block until it's in the room and you can go around and push it over to the far wall, using it to climb up the pillar. Then jump up and grab the crevice, shimmying right to pull up when you can.
There's a panther in the cave ahead, and these take a little more killing than the beasties you've met so far, but you should be OK with your pistols for the moment. The ledge above the opening contains more Magnum clips and another small medipack, so climb up and retrieve them before dropping back down and making your way towards the sphinx. This is where the game gets a little more creepy...as you walk forward, notice a movement ahead...this is the game's first real and dangerous mummy! I normally use the Magnums here! These bandaged monsters can move fast!
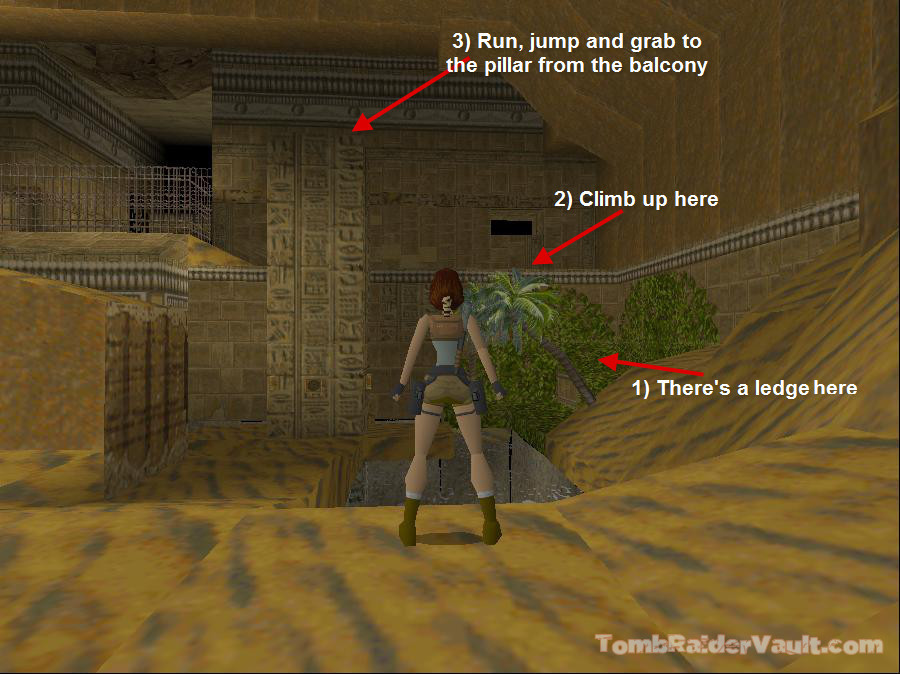
Once you've dealt with the mummy, slide down towards the sphinx and dive into the pool to retrieve two lots of Magnum clips from the bottom. There's more ammo at the top of the pillar in the center of the pool, so climb out near the palm tree, climb up the stepped wall covered in foliage to the left to take a run, jump and grab to the pillar (screenshot). Pick up the shotgun shells then dive back into the water, climbing out near the sphinx.
There's a movable block in front of it...climb up and around the sphinx to the back to find some shotgun shells, the first sapphire key and a save crystal. Pick up the key, save the game and go back down to the movable block. Stand in front of it and pull it out to reveal a door that you can open with the key you just picked up. Follow the path to find a room that has a passage with pharaoh statues down either side. Climb up quickly to find a small medipack, and a panther lurking around the bottom! Kill it then carry on to the far end of the room. There's a sloping hallway to the right once you reach there, and a panther waiting to pounce...proceed carefully until it emerges, with weapons drawn, and back-flip as you shoot until it's dispatched.
Walk up the hallway and turn left to come to a save crystal before a large room with a temple next to a pool of water. There's a croc down below, which you can get from above, before saving your game if you wish. Drop down to see a long passageway beneath where you were just standing. Along there you'll find a large medipack. Retrieve it and come back.
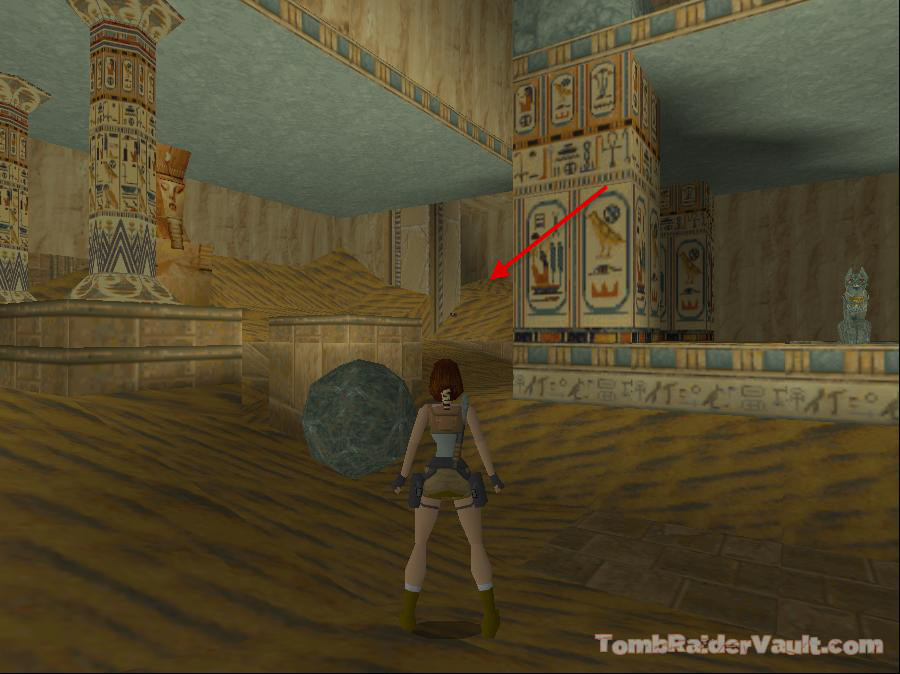
To the right, you'll see a ramp, at the top of which is a boulder. You need to set this boulder away now instead of later when it may squash you! Either run up the ramp or jump up backwards until you hear it release, then either run down and to the side, or side-flip off the ramp to avoid it.
Follow the boulder path and pass it to the far, right corner. Go as far as you can, then jump up the slope. Down and to the left of this (screenshot) is a dark place containing some Magnum clips and a large medipack - the level's first secret. Retrieve them and climb back out.
Jump into the pool back in the main area and follow the passage to a lever. This opens a nearby door, but once pulled, you need to swim through and climb out as fast as you can to avoid another croc! Kill it from there before climbing up to the above walkway. Here you'll find another save crystal, which you can use now or wait until you've completed the next part. There's also a movable block there. Pull it twice towards the steps, climb up then jump and grab the ledge, pulling up and climbing the stairs. Turn around and look up to find another opening...pull up into it and pull the lever you find there. This extends a ledge above the room with the pool.
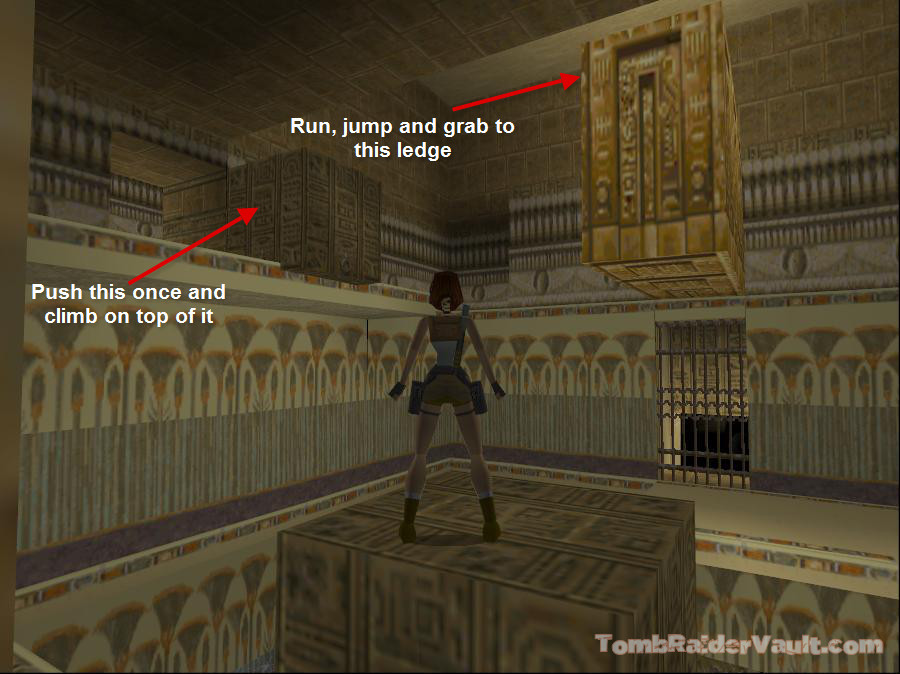
Go back down to the movable block on the walkway and push it twice further towards the steps. Go to the right and pull it once, then climb over it and push it once. Now you should save your game if you haven't already...trust me!
Climb up onto the block you've just moved, then run, jump and grab the ledge beyond, where you'll find another movable block. Behind this block is an opening leading to a room, but there's a horrible mummy waiting inside, so you can either take your chance in the room with it, or push the block, hop back to the edge and safety drop down, climb up onto the first block and try to pick at it from there. These things take some getting rid of, so it's up to you how you deal with it!
(Note: In the PC game the mummy does not appear here.)
Once it's dealt with, enter the room and pull the lever to open a trap door in the ledge that's just been extended. Return back to the block outside of the small room and push it once more and climb on top of it. Run and jump over to the extended ledge and pull up into the opening and pull the lever (screenshot). This opens the trapdoors in the temple back in the main room.
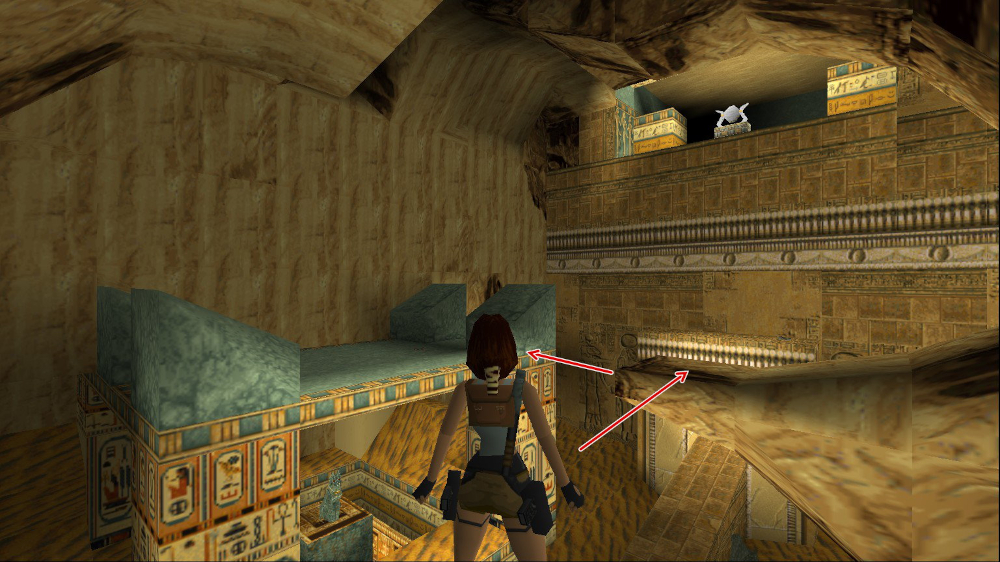
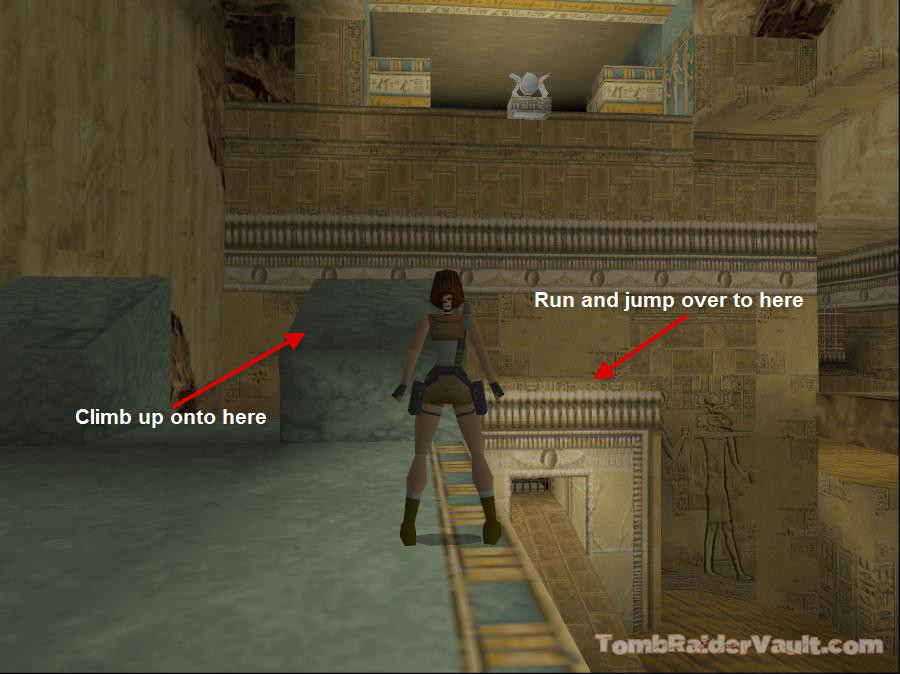
Walk through the opening above the main room and jump to the stone ledge on the left. Walk to the other side of it then run and jump over to the stone ledge beyond. Near the pillar you'll find some Magnum clips which you can retrieve before you slide down the sloped ledge to find a large small medipack. To the right of where you are standing is a brown ledge. Run, jump and grab over to it, and then run and jump over to the blue, stone ledge ahead (screenshot), drawing pistols for the croc that now emerges below*.
At the front, right corner of the roof, you'll find an angled block. Climb up onto it and line up with the ornament in the room opposite and above (screenshot). Run and jump over to the ledge above the door where the ramp with the boulder was. This is the second secret, Uzi clips. Safety drop down onto the ramp to find yourself back in the main room with the temple. (Now you see why you had to get rid of the boulder first!)
Head towards the temple and drop down through the trapdoor you opened onto the blue block at one end. At one corner with the sandy-coloured floor tile is a spike-pit, so avoid that and head through the other doorway. Pick up the Magnum clips then drop down. Turn left and enter the alcove to pull the lever to open a trapdoor in the room above. Use the save crystal and draw pistols for a couple of panthers in the room below. Before you drop down, you can find some more Magnum clips in the alcove behind the cat statue.
You can safety drop down to the room below, but once you do so, a door to the right opens to release two more panthers, so choose your weapons! There's a block at the far side of the room which you can climb on for safety, or just jump around as you shoot (which you can't do very well with the shotgun, although the shotgun is the fastest way to dispatch them if you decide to stay on floor level!)
Go through the doorway that just released the panthers to find another large medipack, then climb up onto the block in the main room. Pull up to the ledge above, the cross the bridge to the pillar. Another door opens below to release another couple of panthers, and you can either pick them off from where you are or go back down to the block you just climbed up from. Once you've done that, go around the pillar across the bridge, run, jump and grab the left-hand ledge with the cat statue, behind which you'll find some shotgun shells in the alcove which is the third secret. Safety drop down and enter the second door that held the panthers to find a small medipack before climbing back up onto the stone block.
Now you can enter the passage beyond the block, opposite the bridge. There's another mummy at the end, and if you stay in the passage you'll have a lot less room to manoeuvre, so if you can, run past it into the large room beyond and fight it from there. Just keep moving and/or use the shotgun until it explodes!
Look around the room and see an reachable opening above. Go through it and follow the passage to find a sandy room containing a pedestal with the second sapphire key! Take it and climb up the sand piles, continuing until you come out above the passage with all the Pharaoh statues! VERY CAREFULLY jump across the ledges, making sure you line up properly before each jump, as you'll have to go all the way around again if you fall! Pick up the Magnum clips, make your way across to the lever, and pull it to open a trapdoor that releases a load of sand into the room you've just come from!
Jump back across the ledges, turn the corner to the sandy room, safety drop down and slide down the slope, and run up the slope next to that one to reach a room with the level-exit doors! Use the sapphire key to go through and exit the level.
*Sometimes this croc doesn't appear
If you missed anything while playing the PC version, here is the savegame file with all kills, pickups and secrets.
{ Previous Level } { Next Level }
Send us feedback about this wakthrough