TRV Homepage | Walkthrough Home | Forums | Awards | Products
Copyright notice: If you want to copy this walkthrough for your own site, please ask permission BEFORE you do so and place the following code on your site at the top of each walkthrough page:I love this level...it's so wonderfully weird and creepy. :-) You will encounter several flying mutants as you go about your business. They are very slow and can usually be picked of with the pistols before they get too close...providing Lara sees them in time! They also explode magnificently when they are destroyed! You can use your grenade launcher to destroy them, but it will take at least three shots.
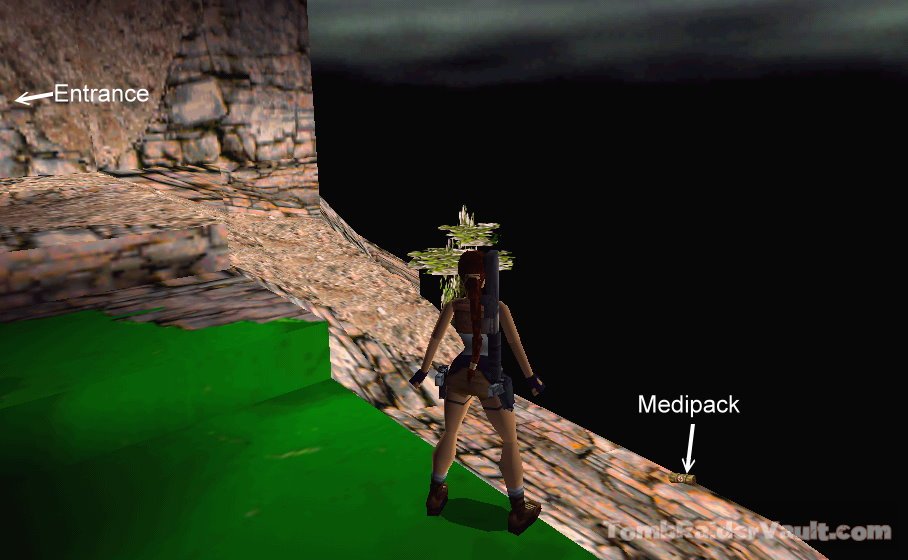
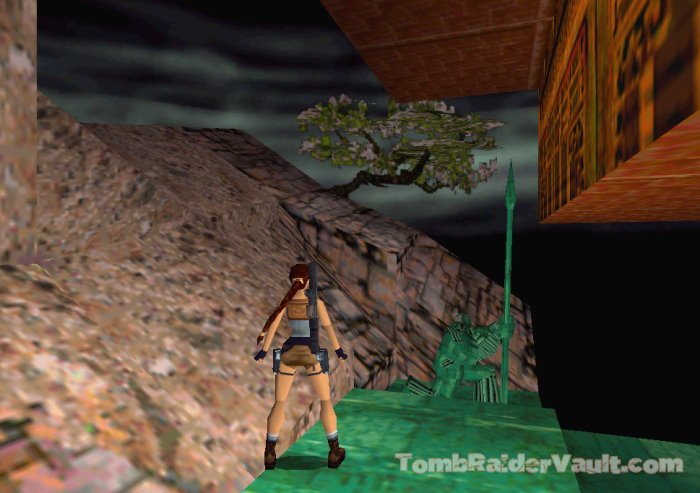
You'll see the first mutant approach, moving in front of you from the right hand side. When he's down, take a look around you and you'll see why they are called the Floating Islands! If you make one false step, you will fall into nothingness!
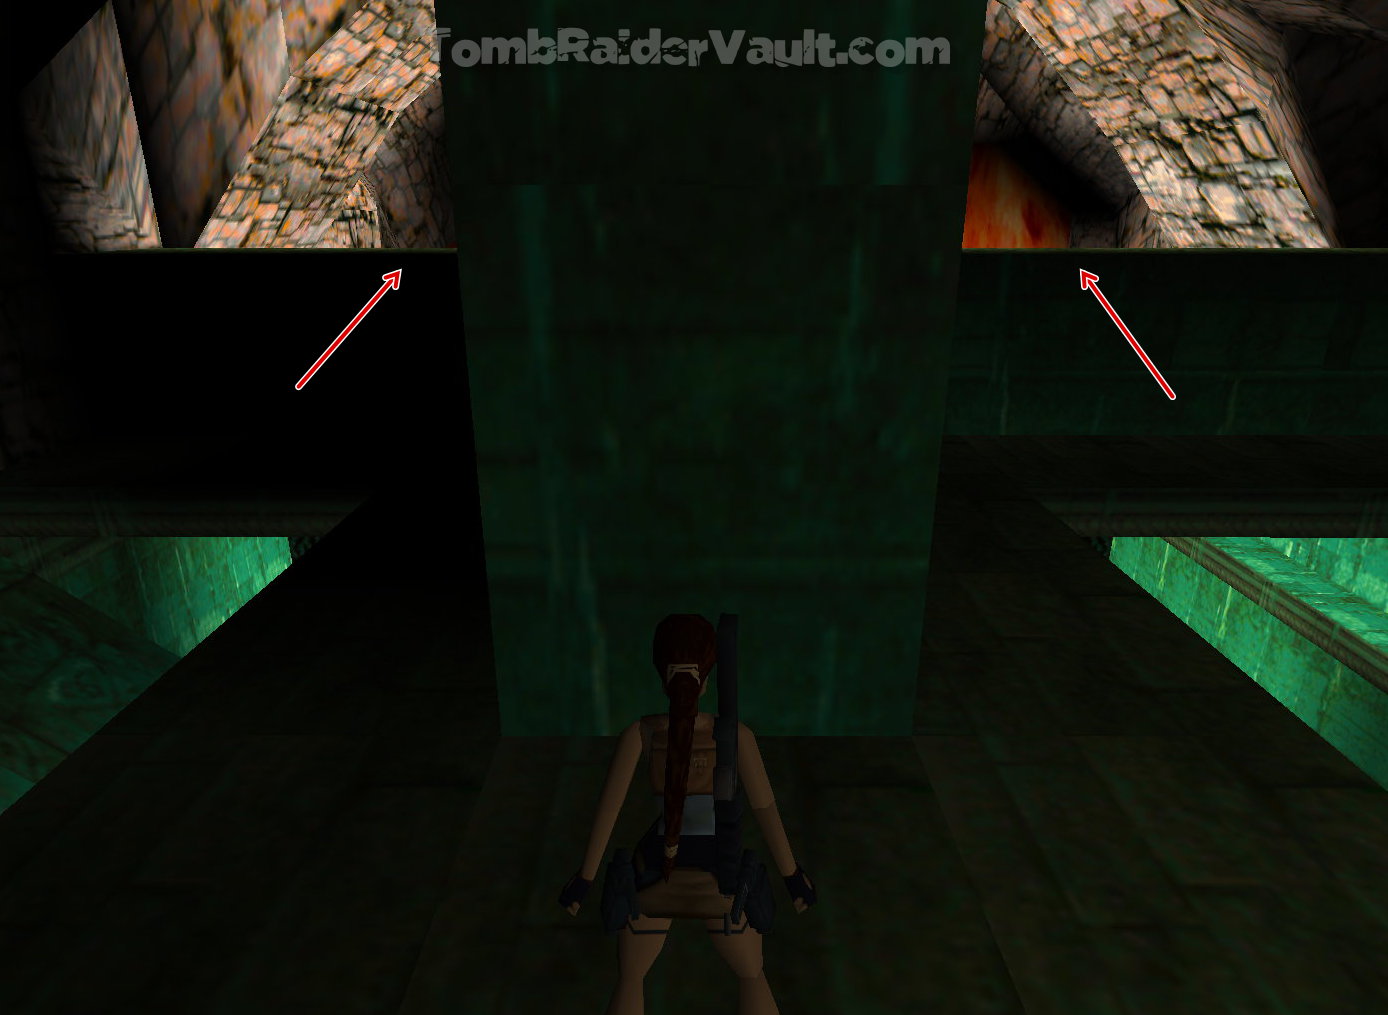
If you turn back to face the entrance, you will see a small medipack on the incline to the right of the path (screenshot). Pick it up then make your way back to the end of the path. To get into the grated building ahead, you need to take a couple of steps back, then jump forward on to the green slope ahead, then jump to the next one as you begin to slide. Then immediately press 'jump' to grab the edge of the building (screenshot). If you miss, you will slide down and land on a ledge below, awakening a green statue* that turns into a flying mutant. You will have to get rid of him before you climb around and up near where he came from to try again.
Pull up and pull the lever at the other end of the building. This opens a trapdoor elsewhere, and a gate in the building you are now on. To reach the floating building, you can do it two ways:
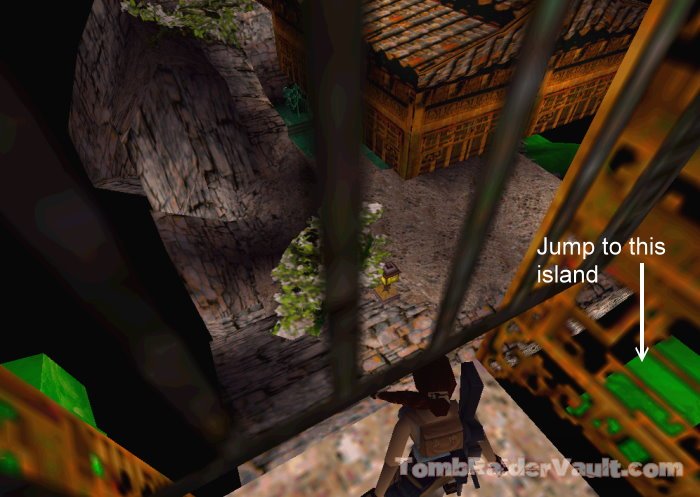
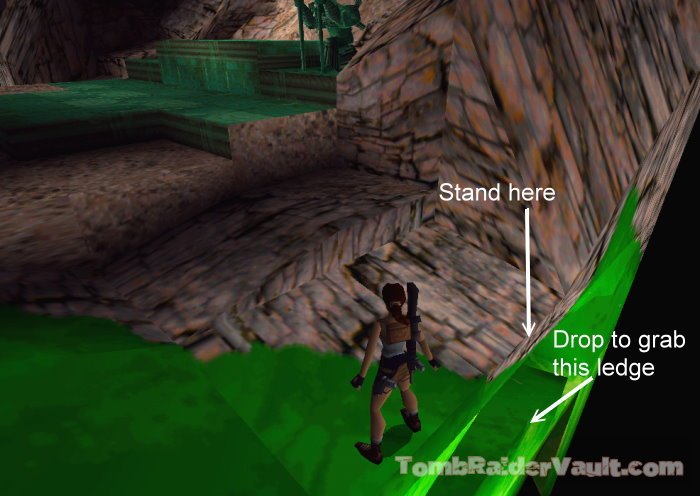
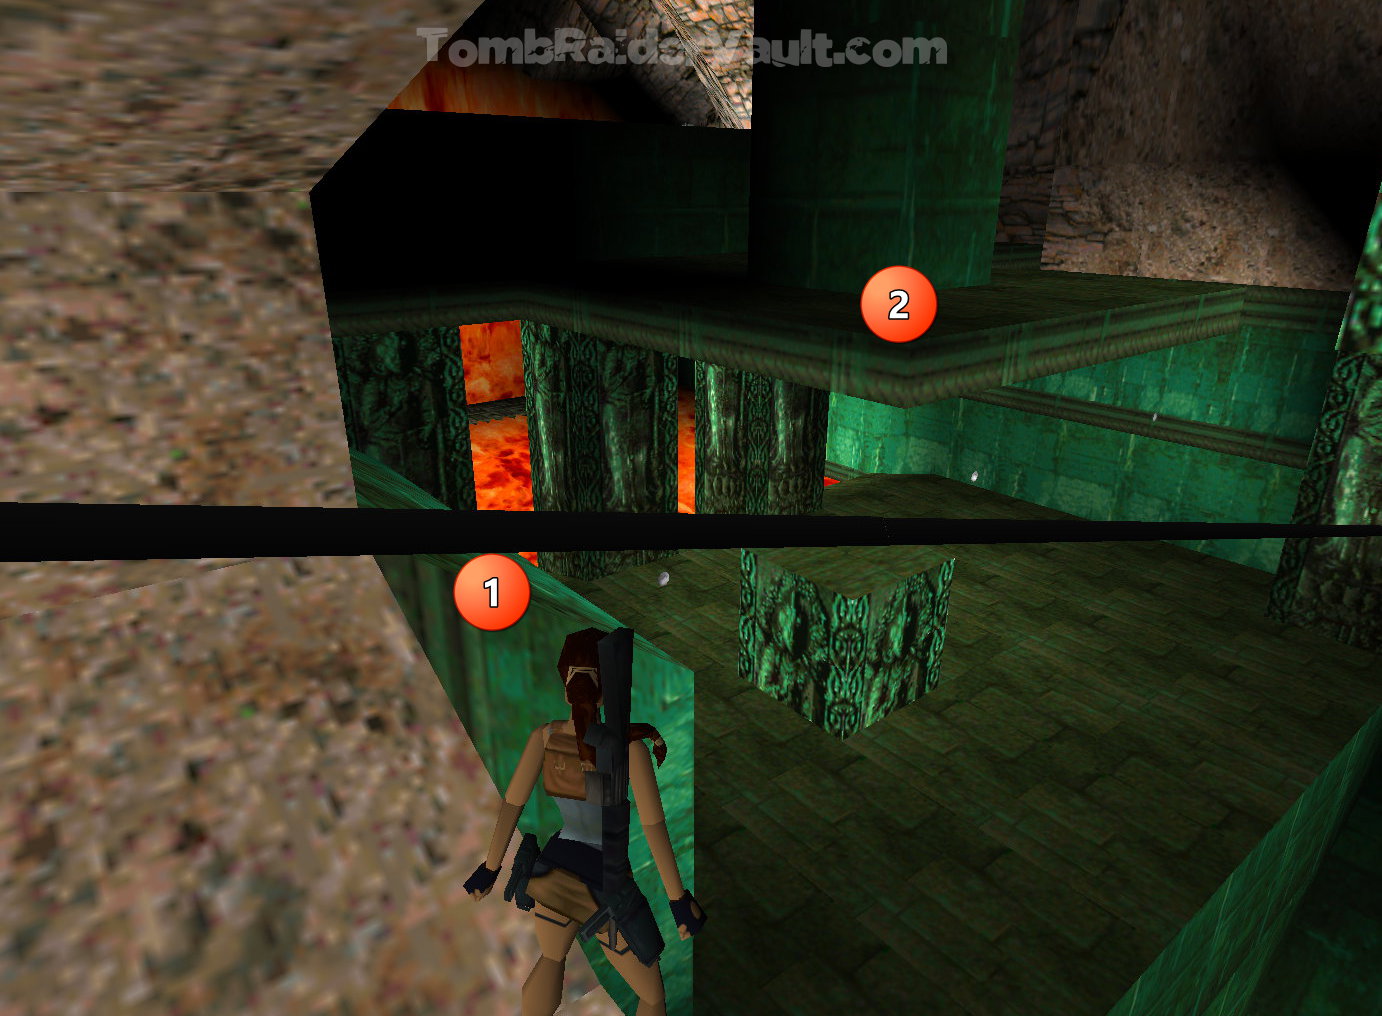
The easy way: You will miss 1 kill this way. Go back to the entrance of the grated building. Take a look down and slightly to the left. You will see a brown ledge partly covered with green (screenshot). If you jump to it you will lose a bit of health, but you are right next to the island with the Mystic Plaque #1, so run and jump to it and pick it up. Run, jump and grab to the island near the building ahead, then jump over to the building, roll and jump back to the little island as a mutant awakens. Kill him in safety.
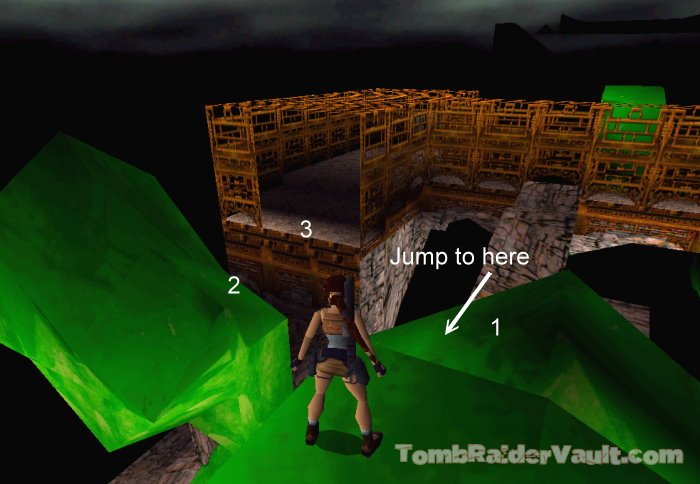
The hard way: Turn around from the lever and walk down the left coridoor to the gate you've just raised. There is a slope just below that leads to another. You need to slide down backwards, then grab the edge. Pull up and jump backwards to land on the one behind. You have already awakened one of the mutants that you saw when you pulled the lever, and he's hurtling towards you! There is an island to the right of that building (screenshot) that is your only safe area. As soon as you run towards it, another mutant awakens, so jump to the island as fast as you can and finish them off from there! Turn around and run, jump and grab to the small island behind. You will need to be very careful, as it's a long way. Don't press 'action' to grab the edge until the last minute, or you may miss...it actually took me several tries, but if you aim for the right of the little island you should make it. Pull up and pick up Mystic Plaque #1. Make your way back to the building.
Go to the building and climb up into the trapdoor you opened with the lever. Pick up the two sets of Uzi clips, flares and a large medipack from two of the corners, then pick up Mystic Plaque #2...as you do so, you hear a mutant awaken from down below. You can get him from above if you are prepared to be patient, but if not, you can head back to the safe island and get him from there.
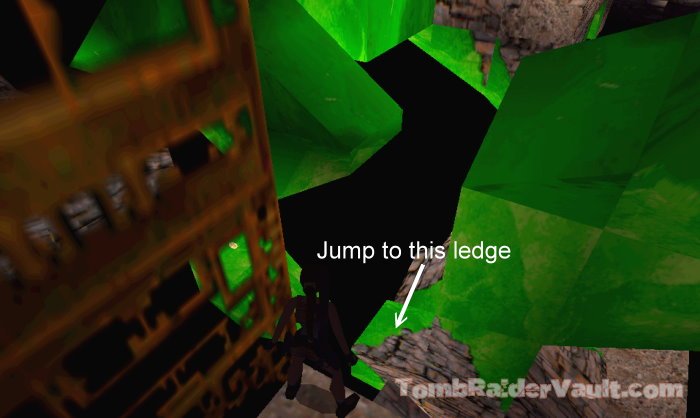
In the right corner is a slope next to a tree (screenshot). Jump up to the flat ledge, then turn around and jump and grab the roof of the building. Pull up to find the Jade Dragon. Drop down and walk to the edge of the island to the left, so you can drop and grab the green ledge below (screenshot). Pull up and find the lever on the left wall. Pull it to lower the gate on the opposite wall to make a kind of bridge.
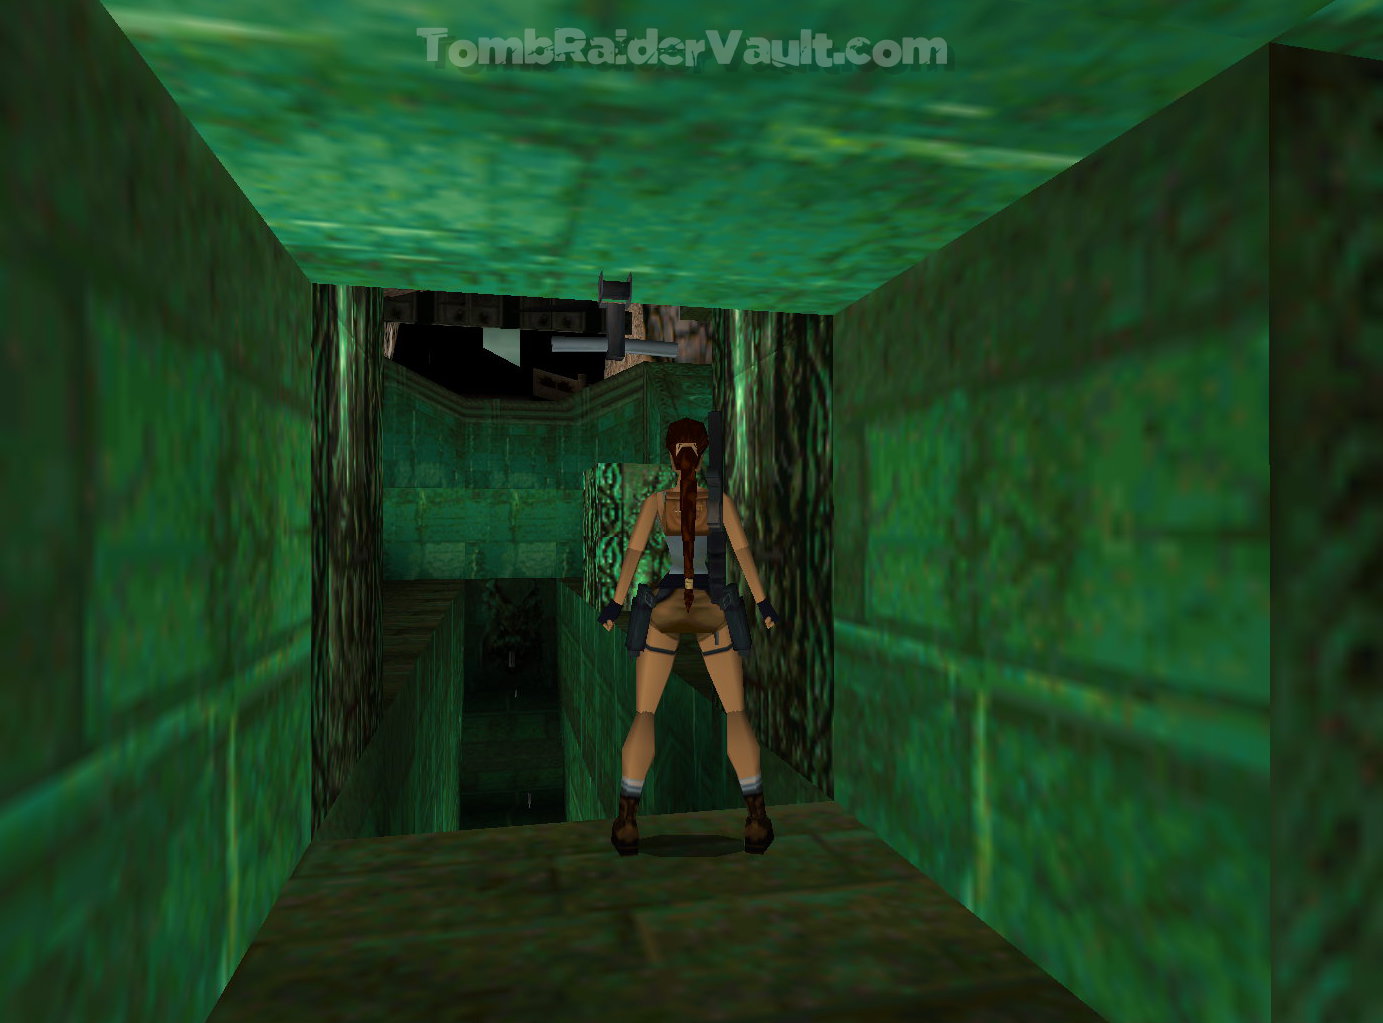
Stand in front of the now open gateway and run and jump to it, and then to the island ahead. Walk to the end, turn left and jump up the slope to land on the flat one above. Run, jump and grab to the next two islands, then to the one with the four blocks. Climb to the topmost block, face right and run and jump over to the last green island. Turn around to face the building with the two mutants at either side. They won't awaken, so run, jump and grab to the ledge ahead, pick up the two sets of Uzi clips from in front of the gargoiles, then use the Mystic Plaques to open the doors.
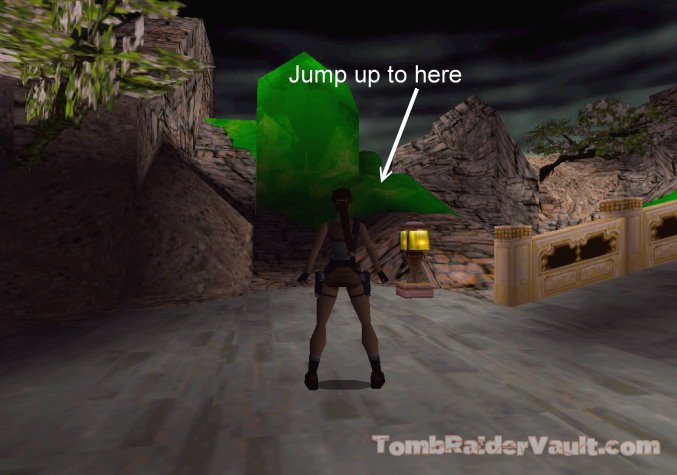
As you enter the courtyard, a flying mutant will rise up in front of you to the left...although he approaches pretty slowly, you will need something powerful to get rid of him before he reaches you. Once he's gone, you can pick up the two sets of automatic pistol clips from the right corner from where you enter. To the left of there is a tree with a secret passage behind it (screenshot). Jump up to it and follow the passage to find the Silver Dragon.
Make your way back the way you came. Go past the doorway and jump up to the green block to the right, with the boulder above it (screenshot). Get as close to the boulder as you can and turn around so your back is to the boulder. Backflip over it, and as soon as you stop sliding, drop back and grab the edge, as this boulder and another one roll past you. Pull up and turn around. Jump the gap and walk up to the flat ledge. Turn to face the right, then run, jump and grab the edge of the island ahead. Pull up and walk to the rope slide. Press 'action' to grab it, and keep it pressed until you reach the lower bridge, then let go.
As you enter the doorway at the end of the bridge, look to the right...there's another rope slide there, but you need to pull a lever to raise a gate at the bottom of the rope slide. As you enter into the room, a curtain on the left rises to reveal three mutant statues. One of them is already awakening, so arm yourself and get rid of him. You need to pull the lever between the other two, but when you do, you know what happens! They both come to life and you need to get rid of them, or you can try and get to the rope slide before they reach you, which will be tricky.
The rope slide leads to a metal ladder. Just keep your figer pressed on 'action' and Lara should grab the ladder at the end of the ride. Climb up the ladder, then the next one, dismounting to the right. Walk to the edge and drop to grab it, shimmy left and drop to the grey ledge below.
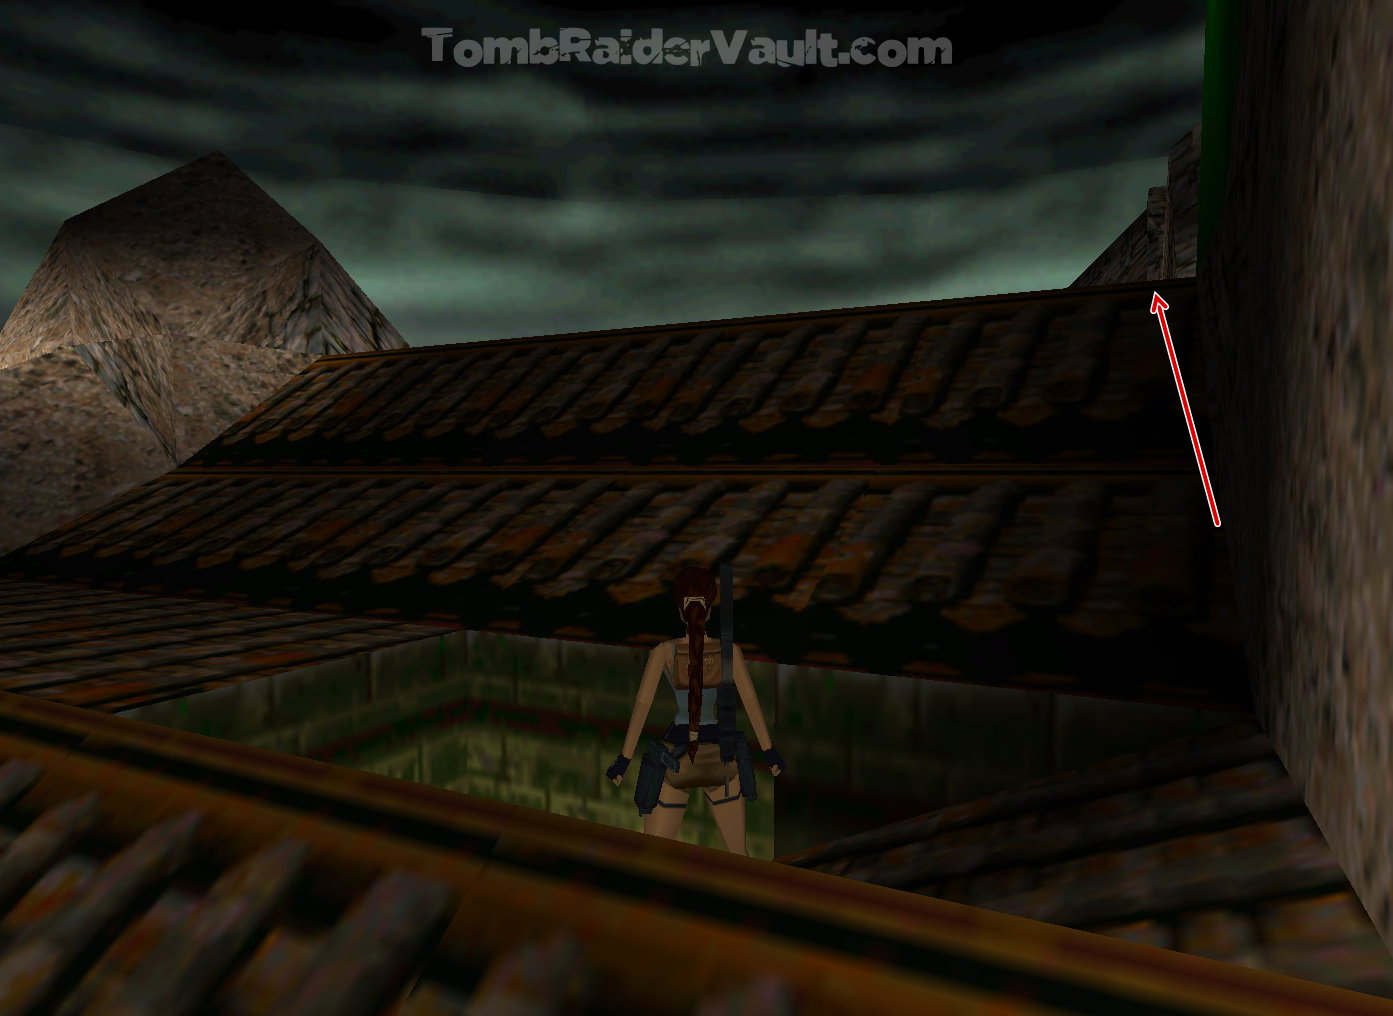
The next room has a green block which you will use to leave this area, but if you want a small medipack, drop down through the opening in the floor in the alcove to the right. A mutant awakens above and ahead, so get ready for battle. Pick up the medipack in the right corner, then go back up into the first room and climb up the angled green block to exit. Walk to the highest end, turn around and jump forward to grab the roof and pull up. Face the roof and jump over on the right hand side to land on the green ledge where the boulders were (screenshot).
Make your way to the small green island with the rope slide, this time sliding past the bridge to land on the ledge of the entrance to the temple beyond. Walk up the small slop to the left, then run, jump and grab to the green ledge ahead (screenshot). If you find that difficult, jump to the sloped ledge on the right, then immediately jump forward to grab the ledge from there. If you miss and fall the the ground, you can pull up to the same angled block, then pull up and backflip to the ledge behind.
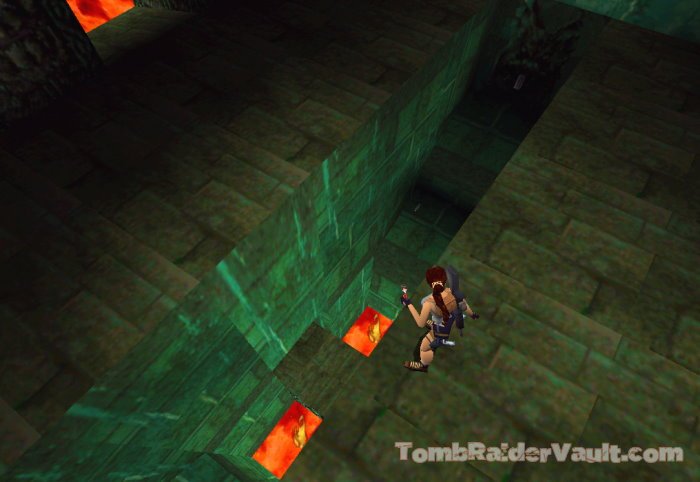
When you do manage to land on the green ledge, a mutant flies in from the right, near the lava pit. Get rid of him before he reaches you. On the other side of the pillar in the middle of the ledge you are on is a lever...pull this to release the hanging block from the pillar on the left, which will then fall in the lava pit below (screenshot). Drop carefully to the ground, avoiding the shooting blades, then drop down to the block you just released. Pull the lever in the alcove to open a long trapdoor in the lava.
Turn around and jump to grab the bottom step to the left, pull up onto the next one, taking care to stick to the right-hand side in case you get sliced. From there, turn right and pull up out of the pit. Get back up onto the green ledge, either by backflipping from the angled ledge, or using the moveable block beneath. When I pulled the block, another mutant floated in from the pit I just climbed out of! Climb up onto the green wall (screenshot) and pick up the two sets of M-16 clips there. Walk to the edge overlooking the long trapdoor in the lava pit that you just opened with the lever. Take a running jump towards it, pressing 'action' in the air to land in the water beneath the trapdoor. Pick up the shotgun shells, then pull the lever at the other end to open a high door back in the room above.
Go back and swim through a small opening to the left. Follow the underwater passage to a small flooded room with swinging blades. Swim right and pull up onto the ledge above the entrance and pull the lever to shut off the blades. Climb through the now safe passage and up the blocks at the other side, keeping away from the blades as they shoot out from the wall. Turn right and line up with the ledge on the right, then run and jump towards it (screenshot).
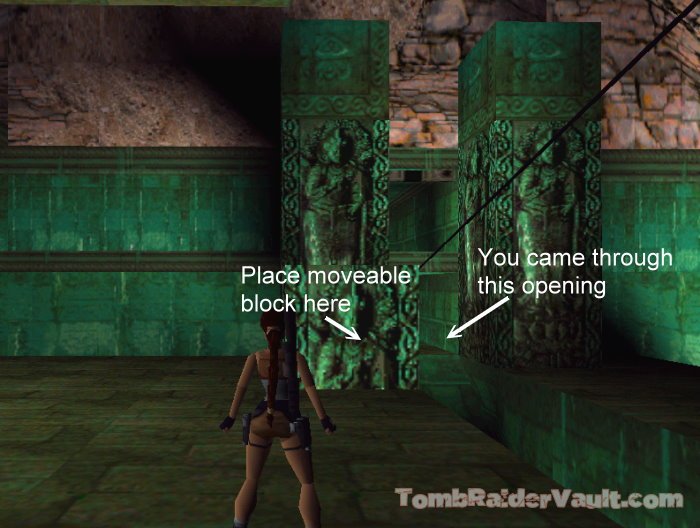
Pull and push the moveable block to the wall where you just came from (screenshot). Climb on to it and jump and grab to the opening above and to the right. Follow the passage past a gate on the left. There is a spike pit ahead, so jump and grab to the other side, shimmy right and pull up to pull a lever to open the gate you just passed. To get back over the pit, run and jump to the entrance you came through, lining up very carefully.
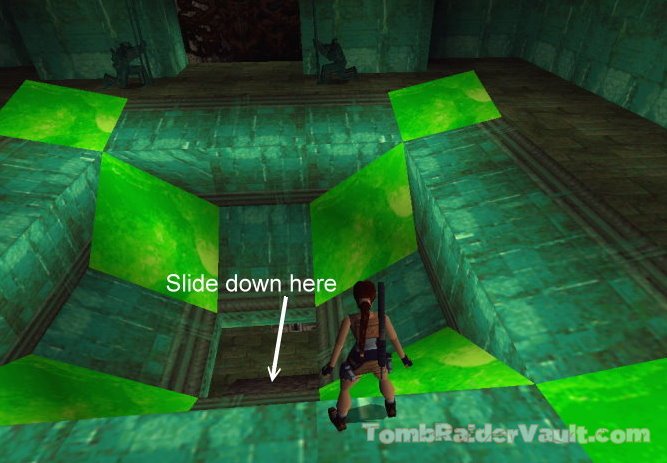
Go through the gate you just opened to find yourself in a room with an opening in the floor leading to a cage. Stand at the opening opposite the statues (screenshot) and slide down backwards, grabbing the edge at the bottom. You land in the cage, but there are four knife-wielding baddies charging around it. When you pull the lever in the cage, it will allow them access, so pull the lever, roll, run back to the ledge and jump up. Those knives are extremelly deadly, so be careful! You will be able to get them all from there.
Before you search the bodies, you need to get rid of the four mutants in the area. As you approach each one, they awaken, so, taking care not to fall into the lava pits at the side of the cage, approach the mutants, then run back and jump on to the ledge again, or the block with the lever and get them from there. I managed to get them all with my grenade launcher before they even activated! :-) You can then drop down and search the bodies of the guys you killed earlier for three sets of Uzi clips, three boxes of shotgun shells, one small medipack and one large medipack.
There are two levers in the room at opposite sides. Pull them to open the exit gates. Run through the first one, in between the two green pillars, and arm yourself for another knife-thrower. When he's down, search him for a large medipack and some automatic pistol clips. Follow the stairs to pick up two pairs of grenades, then continue until you reach another lever. This opens the nearby gate, but also awakens two more mutants. So pull the lever, then pull it again to close the gates and pick the mutants off in safety. Be careful not to get too close, though, as they can get you if you do!
When they've exploded, use the switch again to exit, and go through the door on the right to the metal ladder next to the lava pit. This is a bit of a killer if you're not very dexterous, like me! You need to climb up the wall until you are parallel with the next metal ladder on the wall behind. Jump back, pressing 'jump' and 'roll' at the same time to twist in the air, the press 'action' to grab the ladder behind. Climb up to the red part of the wall, with Lara's feet resting at the bottom of the red strip, and perform the same move to the ladder behind that one. Shimmy left, climb up, then pull up and jump backwards backwards and forwards, keeping your finger on the left button until Lara lands on the safe ledge, but there is another knife-thrower attacking you, so get rid of him pronto and pick up the shotgun shells he drops. (And you have to do all of this while staying out of the way of the shooting blades!)
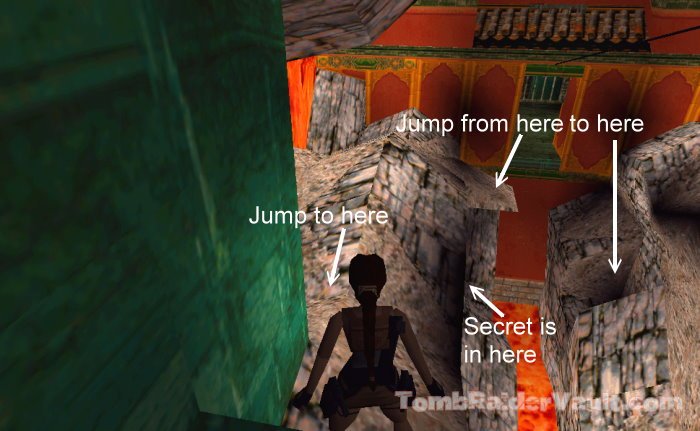
Find the moveable block at the end of the ledge and pull it out once. Then climb over it and push it under the rope slide, but don't use it unless you want to miss the final secret. Turn around and look at the brown rocks ahead. Run and jump over to them, then go to the other side and run and jump to the ledge opposite. Turn around and run and jump into the opening ahead and slightly to the right (screenshot). Follow the passage to find the Gold Dragon and eight pairs of grenades if you found all of the secrets.
Return back to the entrance of the cave, then run, jump and grab to the angled rock ahead, to the left of the flat ledge. Pull up and backflip to the flat ledge above and behind. Turn around and you will see a doorway (screenshot). This is where the rope slide would have dropped you, so jump into the doorway to end the level.
If you missed anything while playing the PC version, here is the savegame file with all kills, pickups and secrets.
*During this level, if you have a lot of harpoons left, you can fire them at any stone mutant before they activate. The more you fire at them, the weaker it makes them, so they will be easier to kill when they do activate. :)
{ Previous Level } { Next Level }
Send us feedback about this wakthrough