TRV Homepage | Walkthrough Home | Forums | Awards | Products
Copyright notice: If you want to copy this walkthrough for your own site, please ask permission BEFORE you do so and place the following code on your site at the top of each walkthrough page:In this level, you need to find all your weapons (which have been cruelly taken from you), plus a harpoon gun and 3 pass cards.
As Lara has been knocked unconscious at the end of the last level, she now awakens to find herself a prisoner! The first thing she needs to do is find a way out of the room she is being held in, which is actually not too difficult, even with the timed puzzle.
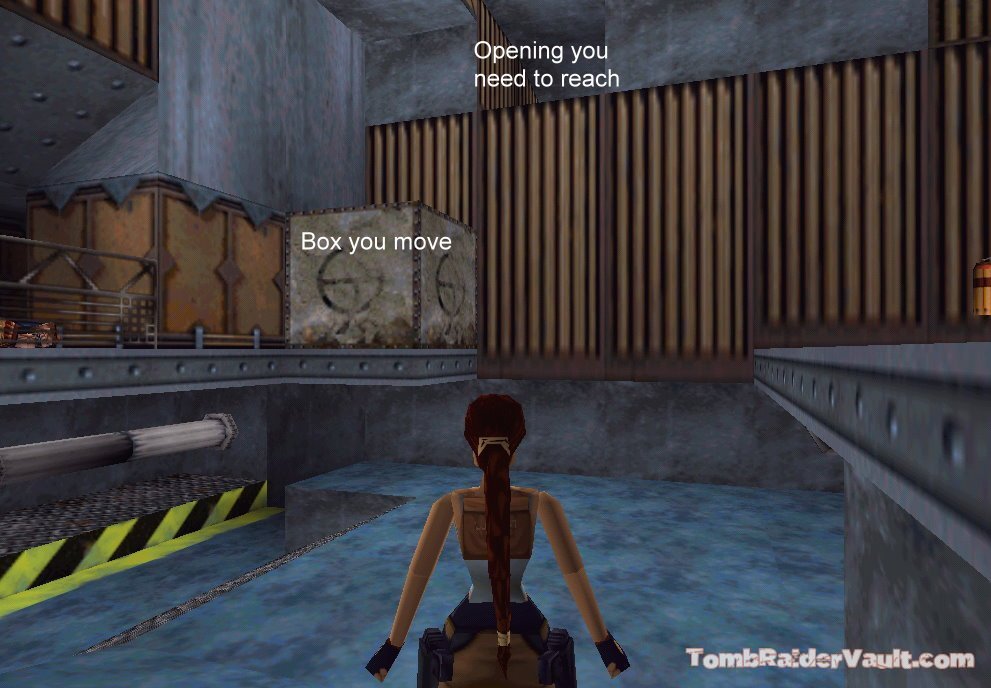
As Lara awakens and stands up, look to the crates on the left. The one that is slightly faded (screenshot) needs to be pulled out once, then pushed up against the back wall, so climb over it, roll and push it once. Pull out the crate that was behind it, and push it up against the first one. Follow the path you have cleared. You come to another box...pull this out three times, then climb over it and continue until you come to the timed switch. This opens the door for you, so throw the switch, roll and run through the passage you have cleared, and out of the door.
Now, there are two ways you can do the next part...the proper way, or my daughter's way...which is much faster but far more dangerous! However, both take you to the same place.
The fast way: Run out of the room and turn left...follow the passage, being carefull not to run up the ramp and set the barrels rolling and squishing you, although my daughter has had some success by using the rolling barrels to kill the thug with the club! Two thugs are there, one with a gun. Try to get past them with as little damage as possible, turn right and keep moving to avoid the goons until one of them shoots out a window! Run through it, turn left, jump over the gap and turn into the doorway further down on the left hand side. Follow the passage and jump into the water.
The 'proper' way: Run out of the room and jump straight into the water, swimming to the far left corner, surfacing near the plane for air. Take a look around and you'll notice a large, spinning fan under the water...this will suck you into it if you get too close. Take note of the barrels under the water. Near the fan, there is a lever that you need to pull (screenshot). Swim to it as close to the wall on that side as possible, pull it, swim to the left to grab some air before you go any further.
This lever opens a door at the other side of the underwater fan (you can also see a secret, but leave that for now). To get through this without being pulled into the fan, swim around the barrels at the bottom of the pool, swim along close to the right-hand wall, keeping your finger on the right-direction button until you swim through the doorway, to counteract the current caused by the fan. Keep following the underwater passage until you can surface.
Look down to see a lever beneath the opening you just swam through. Swim down to pull it, then resurface for air, as you have a long swim ahead of you. Once you've pulled the lever, swim down through the opening and follow the passage almost to the end. A trapdoor in the floor opened when you pulled the lever, so when you near the end of the passage you will see it. Swim down and up to an area behind the fan, where you can now retrieve the Jade Dragon. Do a roll and swim back the way you came before you run out of air.
Once you surface, take a look around...you can see an opening you can climb up into. Do that and follow the passage, running past the windows on your right, taking care to jump over the gap. Run off the edge of the platform and you will see a button on the wall to your right. Push this to open a small hatch on the underside of the seaplane.
Jump into the water and swim underneath the plane and climb up through the hatch you just opened. Push the button on the far wall to turn off the plane's propellers. To get back, you are going to have to go through the underwater passage again, so remember to keep the right direction button pressed to keep you from getting sucked into the fan!
Make your way back, climb out, run through the passage, jump the gap, but this time you are going to jump onto the top of the plane, so instead of jumping off the edge of the platform, turn, drop down to the platform below and face the plane as seen in this (screenshot). You are going to have to line up facing the right propeller, but slightly to the right. There's a broken piece of railing at the end of the platform, which is where you need to be.
Run, jump and grab to the edge of the plane to the right of the propeller and pull up. Run over the top of the plane and you will fall through a trapdoor to find your pistols! Yippee! Now climb up the ladder below the trapdoor to exit. Now you have your guns, you are ready to tackle the bad guys again. Swim to the platform near the room in which you were held at the start of the level. I always sneak up toward the right-hand wall and climb out, then take out the pistols to let the two guards have it!
When you have dealt with them, one drops a large medipack, and another a yellow pass card. You need this to be able to access other parts of the area. Go through the passage that has the ramp with the barrels, taking care not the set them rolling toward you! At the end of the passage, turn right, and you'll see, set into the right wall, a card lock...use the yellow pass card in here to open a door to your right.
The pass card sets off an alarm, but you can turn it off by running into the now open door and pushing the button on the end wall. Take the right-hand passage and unlock the door at the end by turning the wheel. A baddie with a club comes up behind you, so run into the next room, roll and draw your pistols ready. Get rid of him before you enter the next room as another club-wielding goon comes for you when you do. Deal with him then pick up the two medipacks they they dropped, a small one and a large one.
Don't bother going up the ramp as the door closes before you can get to it. Instead, open the door at the bottom and get ready for another thug...take his large medipack once he's down and enter the next room. Look around to find some two sets of automatic pistol clips and two lots of harpoons! And yes, Lara's very health-conscious and doesn't smoke, so leave the ciggies where they are!
Enter the next room with the bunkbeds and search them for your automatic pistols (yay!) and a harpoon gun (double-yay!). As you enter the room, the top bunk on the left-hand side has a button set into the wall. You need to push this to open a timed trapdoor high in the wall at the other end of the room. Save your game when you are in front of the button. You need to push the button, then tap the 'look' button on your controller as the camera will show you the trapdoor opening, and you need every second. Jump down from the bunk, turn left and run to the very end wall, climb up to the top bunk on the right, roll, walk to the edge, and jump and grab to the opening ahead (video). Climb up and relax!
The next area has a slope leading to a huge drop that will hurt Lara badly, so at the top of the slope, turn around, drop back, keeping 'action' pressed to grab the edge of the slope at the bottom. Then Lara can climb safely down the ladder to land in the burner room. You need to get to the ladder on the right side of the room, and you can do this by moving a crate right up against the burner platform. So, pull out the crate on the right and push it right up against the wall opposite the entrance. Then pull the other crate out and move it to the middle of the room, right up against the burner platform facing the ladder. Run, jump and grab to it from the second crate, climb up and enter the passage ahead.
As you turn the corner, another thug appears so get rid of him and take the red pass card that he drops. Before you go up the stairs, climb the long ladder on the left wall to an outside area where you'll find the Silver Dragon. Climb back down and head up the stairs. The opening around the corner brings you out above the small room with the underwater lever. Jump in, climb out and go back to the main area, shooting a window to get through.
Go back down the passage with the button that turned off the alarm, and take the left turning this time. As you turn the corner at the top of the stairs, you are greeted by a dog and a shooter, so be prepared! The thug drops some Uzi clips. The ramp in that room has some barrels at the top that roll down as you head up it. To avoid them, take one step up the ramp, then do a backflip and a sideflip to avoid them.
The door at the top of the ramp opens with the red pass card...open it but be prepared to be savagely assaulted by three thugs...get rid of them and pick up the goodies they all drop: a small medipack, shotgun shells and some flares..
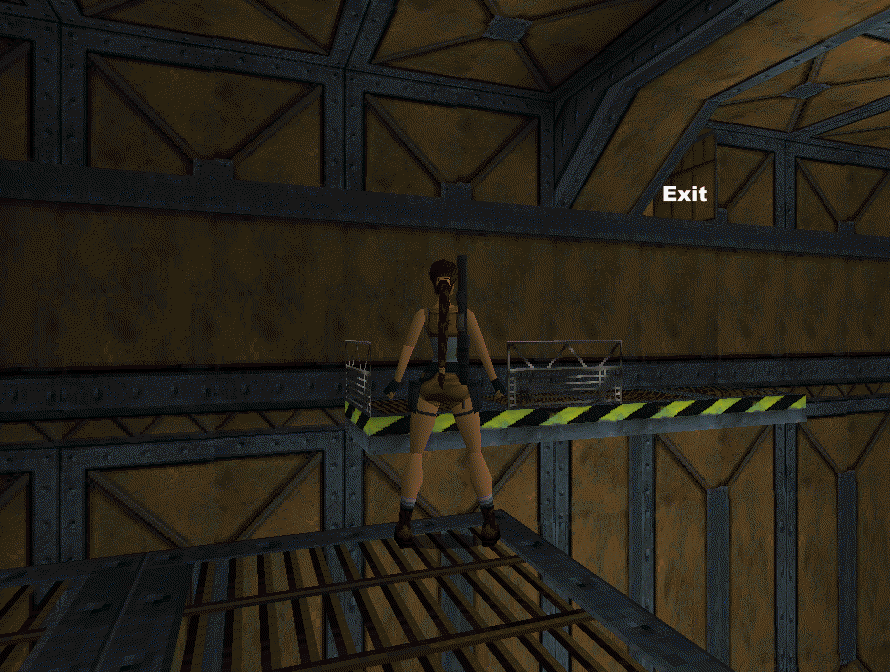
Jump over to the platform to the left of the entrance as you come in. You will see a movable box. Push it once, then drop back to the floor and climb up behind it to pull it once, then go back to push it again so it's placed at the edge of the platform (screenshot). To get on top of it, climb up on the ledge directly opposite then run, jump and grab, pulling yourself up. Stand at an angle and jump forward to grab the opening and pull up into it.
In the control room around the corner is a shotgun-wielding thug, so take care of him and pick up the shotgun shells he drops. There's a switch on the left wall...throw it to fill one of the pools outside the room with water. Go back out of the room and jump into the water, swim across and jump over the large pipes to a platform at the back of the room (screenshot). Jump up the small ramp and flip the switch to open a trapdoor in the control room.
Make your way back to the control room and jump down into the trapdoor that just opened. Follow the passage to a long slope and slide down it. You end up in a large area with water underneath. There are a lot of baddies in here, and a couple of them are frogmen, so if Lara takes aim at the water, shoot! There's more than one way to tackle this room, but I'm a coward so I'll show you the easy way...then you will be able to shoot most of the bad guys from a distance!
Okay, there's usually a frogman at each end of the platform you are on. Just take a lesiurely walk along to each end and fire when Lara takes aim. When they are dealt with, go to the left side, turn to face right and run, jump and grab the platform opposite. At the end of that one, run, jump and grab to the one which is slightly diagonal to the left, then jump from there to the small one adjacent to that one. Walk to the edge and you may be able to get a lock on a baddie to the right. If not, you can get him from the large platform ahead.
Jump to the next platform on the right, then run and jump over to the large one on the left. Kill the goon if you haven't already and pick up the shotgun that he stole from you! You should also be able to take out another goon ahead and to the right. Walk around and jump and grab to the next ledge, taking out your weapons for another killer to the right of it. Take the shotgun shells from the guy you dropped before and walk to the edge of that platform.
Run and jump over to the platform with the railings, and do the same to the next one. Jump to the platform with the now dead baddie, shoot out the window ahead to take the green pass card. Drop down onto the footing below the pillar to find the Gold Dragon. You will also receive your Uzis and two sets of Uzi clips if you have found all of the secrets. You are rushed here by thugs (or sometimes only one). You can either get them with your weapons of choice, or just leave them and jump into the water. You will get a small medipack from one of them, but the last time I played this I only had one baddie to contend with and no medipack! :-( However, if the second one doesn't show, you can look for him behind the column, sometimes he hides there.
Swim to the column in the far left corner of the area, diagonally opposite the ledge you are now on...it has a ladder on the wall behind it. Climb up and make your way around the top. The exit is above the ledge with the railings (screenshot). Climb through the opening and follow the passage to another ladder. Climb it and follow that passage until you come to an opening in the floor. Drop down it with weapons at the ready for another thug. Get rid of him and pick up the small medipack he drops.
You are now back near the control room. Run in and place the green pass card in the slot for it on the right wall. This opens the exit door of the control room. Pull the lever on the other wall to drain the first pool and fill the second. Go through the door and jump into the filled pool, swim through the opening near the top and follow the underwater passage to a lever next to a door. Pull the lever to open the door and swim through. Continue until you come to a place you can climb out...follow the passage to end the level.
If you missed anything while playing the PC version, here is the savegame file with all kills, pickups and secrets.
{ Previous Level } { Next Level }
Send us feedback about this wakthrough