TRV Homepage | Walkthrough Home | Forums | Awards | Products
Copyright notice: If you want to copy this walkthrough for your own site, please ask permission BEFORE you do so and place the following code on your site at the top of each walkthrough page:In this level you are looking for The Dragon Seal and and 3 keys, and it's full of difficult obstacles and booby-traps...you need to save your game often if you are to complete it without tearing your hair out!
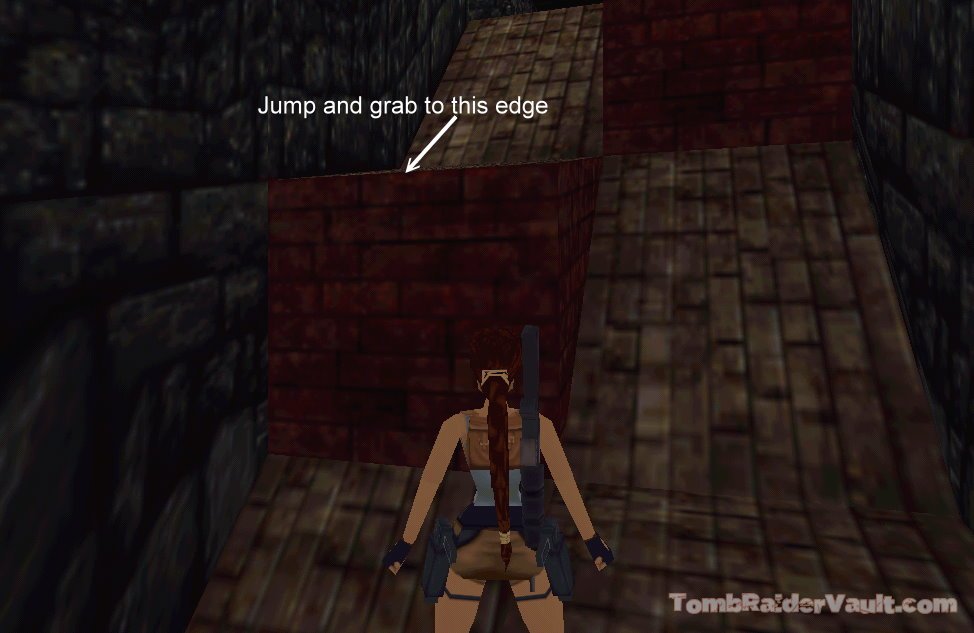
Okay, the obstacles begin immediately. Go through the first two rooms. In the third, you will see the Dagger Of Xian. Oh, you may think, this is easy! Well, this is Tomb Raider after all. As you move towards it, a trapdoor opens beneath your feet. To take as little damage as possible, stand with your back to the pedestal and jump backwards onto the dark area of floor. As it falls away, you begin to slide...that's ok, but when you land on the long ramp below, you will hear the sound of a swinging blade behind you and a boulder rolling towards you. Jump over the blade and press 'action' to grab the edge of the ramp...this way the boulder rolls harmlessly past you.
Drop and you will begin to slide again, eventually facing forward as you slide down a waterfall. Press 'jump' and 'roll' to turn around, then press 'action' to grab the edge of the waterfall. Shimmy left and pull up into the opening to pick up the Gold Dragon.
Unreachable room
To the left, up above the pool, you can see a ladder on the wall. There's an unreachable room at the top with a large medipack inside. There's no way to reach this without cheating! You can use the unofficial flight patch (PC) to get to it, but use it at your own risk. I didn't create it, but I did use it for this level, and the savegame file at the end of this walkthrough page will include this pickup. Here is my save file with Lara already at the top of the ladder. The patch didn't exactly mess with my game, but it did change the resolution and I had to re-configure the settings to right it again. The patch just makes Lara 'swim' through the air when the cheat is used...it's quite cool, actually! However, please be careful about downloading any patches you find, and do a virus scan before you run them.
Drop down into the water and the current will drag you to a wooden ledge...climb out and shoot the two fish that swim out to greet you. Jump into the water and swim through the right tunnel. There is a small opening on the right as you are swimming which contains a small medipack. When you've retrieved it, swim out and to the right to find the temple entrance. On the rocks to the left are some shotgun shells. As you approach the temple, two hungry tigers attack, so ready weapons to get rid of them.
Go to the side of the temple entrance on the left, and stand before a small springboard on the floor, so the water is on your right (screenshot). Run onto it to be catapulted into the air to land safely on the ledge above. You don't need to press 'action'. Walk around the perimiter of the room and pull the lever, which opens the trapdoor above the wooden ledge. Arm yourself for an eagle that flies up toward you.
Safety drop down and jump into the water and swim back to the wooden ledge, and climb up the now open trapdoor. Destroy the robot-spider-thingy at the top and drop onto the ledge at the end. You are now in a large room with a lava pool at the bottom. Turn around and climb down the ladder, dropping and grabbing to the next one. Don't pull up, but shimmy left, pull up climb down the next ladder, and drop to grab the one below before pulling up onto the ledge. Walk around to the crevice and shimmy right to reach the Silver Dragon.
To get back, shimmy back along to the left and pull up. Walk the full length of the ledge (screenshot) and kill the spider before jumping forward to grab and climb the ladder. Climb the next ladder and follow the passage until you come to a pit with spikes at the bottom. Drop down carefully and walk around the pit to the left to climb the ladder. At the top, go to the right. The camera will pull away to show you more spikes, but there's a safe ledge behind you at the end. You need to jump backwards onto this, then immediately jump forwards onto the safe ledge ahead (screenshot).
Walk forwards to the other side. You can see a cracked ledge ahead, with a platform underneath holding some shotgun shells. Run over the floor, but stop on the last tile...you will drop to land on the platform beneath. Pick up the shotgun shells and walk to the edge of the platform. Jump toward the opening, slide, jump over the spikes, then immediately jump forward, pressing 'action' to grab the next ledge, then pull up. Drop onto the slope to Lara's right to slide and land safely near the grenades on the floor. Pick up the grenades and climb up onto the flat block immediately to the left of the area entrance, turn left and climb up onto the next one, then jump up to grab the crevice and shimmy along to the left. Pull up and pull the lever to open the temple doors.
Go through the opening on the left and jump into the water to make your way inside the temple. There are some M-16 clips lying next to a statue of a warrior with a sword as you make your way inside. The sword will begin to swing up and down as you near the ammo, but you should be able to pick it up safely if you are careful.
Go through the doorway ahead and climb up until you reach a room filled with angled blocks above a lava pool. You need to run and jump to the rock opposite the entrance, slide and jump at the end to land on the next one, then jump from the next two to grab the last ledge by pressing 'action' (screenshot). Pull up, walk to the left edge, then run, jump and grab to the block ahead of the opening, and pull up.
Now, you will see a lever ahead of you, but that's a red herring...as soon as you step on the floor, which is actually a trapdoor, you will fall through it and begin to slide towards a room with two spiked doors that will begin to close in on you as you land at the bottom. There are two ways to do this, one to get the small medipack at the bottom of the slide, and the quick way without getting it.
Quick way: Run forward onto the trapdoor, slide, drop to the floor beneath, run over the bones of the last poor critter who tried this, pull the lever, roll, run towards the doorway ahead¹.
Hard way: Jump onto the trapdoor, slide and drop onto the floor, jump forward while pressing 'action' to land beside the medipack and pick it up. Jump forward to the lever, pull it, jump back, pressing 'roll' at the same time to twist in the air, and then run and jump towards the doorway ahead¹. I couldn't do this without any damage, so I advise you to make sure you have full health before attempting it. (Video)
Follow the passage and the door will close behind you. There is a ramp ahead, and as you start up it a boulder will roll down from the top. Luckily, there is an alcove on the right that you can duck into to avoid it. There are a couple of more boulders ahead, but you can avoid them completely by doing the following: Go up the ramp and drop into the left pit at the top. Turn around and pull up onto the block beside you. The second boulder should roll harmlessly past. Now, look to the right and you will see a boulder at the top of the ramp you are now standing on (screenshot). Drop and grab the edge of the ramp and shimmy left, pulling up at the end...this should avoid setting the boulder off altogether.
Climb up the ladders to reach a very dark room. You can hear the noise of more swinging blades, but they are not in here...however, don't relax just yet! Light a flare and drop into the room. Go to the far right corner where you will find a lever. This opens a doorway above and to the left of you (screenshot). However, as soon as you pull it, a tiger will attack from behind, so you can either kill it or sideflip left, turn, run, face the opening and climb though it as quickly as possible to avoid the tiger.
Light another flare if you need to, as you will probably need it for the next part. Jump across to the ladder, but don't climb up...you need to get down past the two swinging blades beneath you! Climb down as close as you can to each one, then let go of 'action', quickly pressing it again to grab the ladder. At the bottom is another obstacle...two rolling blades. Run past the first one to the far wall as it's moving away from you. Turn to face the left, then run past the second one to the doorway.
You are now in the rafters above the entrance to the temple, above the warrior statues. Take our your weapons for two eagles, then prepare yourself for another heavily timed run. There is a button on the wall to the left, and a door at the opposite end. The button opens the door, but only for a few seconds. Push the button (if necessary, tap the 'look' button to get Lara's view back), roll, then do a series of running jumps over the rafters to the door at the other side. (Please make sure you save your game before you try this. If you fall down to the hall below, you will not be able to get back. The trap with the spiked walls will kill you every time you try, as they have remained closed!)
Through the doors is yet another horrid obstacle...four swinging, spiked balls that will cause some serious damage if they hit you! (Note the trapdoor on the ceiling...you may need that for later if you want all the kills). Getting past them in theory is simple enough...you just need to stand as close to them as you can, then run past each one as it swings away². You can also run past the first one, drop and grab the edge, shimmy past the next two, pull up and run past the last one.
Stop before you go through the next opening, as the floor is cracked and will break away into the lava below. There are two buttons on the walls to the left and right. Push the right one to open the gate ahead, then sideflip to push the left to raise the platform through the opening; run through the opening, over the cracked floor and across the long ledge ahead. A boulder will chase you from behind, but keep running, and jump forward at the end, pressing 'action' to grab the ledge ahead. You can also cross the broken floor, onto the soldid block ahead, drop and grab the edge of it so the boulder rolls safely past. Then you can cross the long ledge at a more sedate pace!
Pick up the Dragon Seal from the block in the room with the dragon statue, then run and jump across to the block to the right of the one you are on. Pick up the automatic pistol clips on the step near the door, and two more sets of automatic pistol clips on the floor inside the dark room. and pull the lever to raise some blocks in the previous room. At the other end to where you came in is another doorway. As you approach it, 2 spiders appear from behind.
Drop down to the bottom of the blocks. Run and jump to the brown block on the right wall, then again to the one ahead. Turn left and run and jump forward to land on the sloped platform...keep pressing forward and jump to grab the edge of the next sloped block, pull up, slide and then jump forward to land on the block ahead.
Turn right and run, jump and grab to the next block. Face right, and run and jump to the low block ahead. Now, ahead of you is a springboard. Walk to the edge of the block you are on, hop back, then jump forward onto it, keeping the forward button pressed so you land on the platfrom ahead. Iimmediately drop back and grab the edge to avoid the boulder that comes hurtling towards you! Pull up, jump to the block to the right, then immediately backflip back on to the first one to avoid another boulder (screenshot). Jump back on to the second one, then take standing jumps over to the next two, in the same direction. Turn left and jump to the next flat block ahead and ready weapons for another eagle. Note that if you misjudge the jump and land on the grey-tiled slope to the right, you will slide down onto another springboard...if you press the left-direction button as you jump up, you will land safely on the next ledge in the sequence! See this (screenshot). As it is, you can slide forwards onto the springboard, press forward while you are in the air to land on a ledge ahead. Turn to the right, run, jump and grab the ledge opposite and pick up the Jade Dragon and eight sets of Uzi clips for finding all three secrets.
Turn right and jump forward onto the first block on the slope again, and make your way to the top. When you reach the middle platform where you killed the eagle, jump and grab to the platform to the right and pull up. From there, run and jump to the next one on the left, then again to the one before the doorway. Enter the doorway, pull out the moveable block twice and enter the opening behind. Go through and pull the lever to open a trapdoor in the floor. You can drop to the floor beneath safely, but you land right in front of a boulder which will begin to roll as you run down the ramp. There is an opening to the left at the bottom, so run into this to avoid being squished!
You slide down a small ramp and find yourself back in the rafters above the temple entrance. If you want another kill, you will have to use open the timed doors again and climb up through the trapdoor in the ceiling before the swinging spiked balls where you disturb another tiger. You will come out once again in the room with the dragon statue, where you picked up the Dragon Seal, so you can make your way back to the rafters.
There are now two tigers roaming around the entrance, but you should be able to lure them out by dropping and grabbing the edge of the rafter and pulling back up (or you can just drop down and go for it). When they are dead, drop down and place the Dragon Seal into the receptacle on the back wall to open the gate to the left of it. Follow the passage, and avoid the rolling blades by using the alcoves in the walls on the way down.
The slope ahead leads to a room with shallow water and a spiked ceiling that begins to descend as you enter. There is a small medipack next to the skeleton, and you have enough time to pick this up and pull the three levers on the walls of the room to open the exit. Go through and climb up onto the low block then run, jump and grab to the next.
The next area is a pool with a series of underwater levers and doors. Firstly deal with a fish that appears...if it doesn't, jump in to draw it out then climb back out to kill it. Jump into the water and pull the lever next to the large doors. This turns off a strong current in the passage on the opposite wall so you can swim through. Before you do, though, come up for a breath of air. Swim down through the large opening, bypass the lever on the left wall as this turns the current back on by opening the door at the end. Swim through a smaller opening near the top of the right wall and pick up the small medipack (if you want). If you need to, swim back for air before pulling the lever next to the medipack. This opens the door opposite, so swim through to pull another lever that opens the large doors back in the main pool.
Swim back and come up for air where you first came in. You should now be able to climb out and pick up the large medipack and grenades from the ledge there. Jump back in and swim through the large doors to pull another lever. This opens up a smaller doorway staight opposite the main entrance, so swim back into the main pool and swim to the right and up to climb out onto another ledge.
The next area is a room below the one with the spiked walls. Kill a fish that's swimming about and pick up the two boxes of shotgun shells and M-16 clips from the bottom and from the block in the middle. To the right of the room (from where you entered) is another doorway. There is a spiked wall to the right that will move towards you as you enter. Run in to the left and pull the lever on the right wall. This opens a long trapdoor near you, so turn left and run to the end of the room, dropping down through the trapdoor.
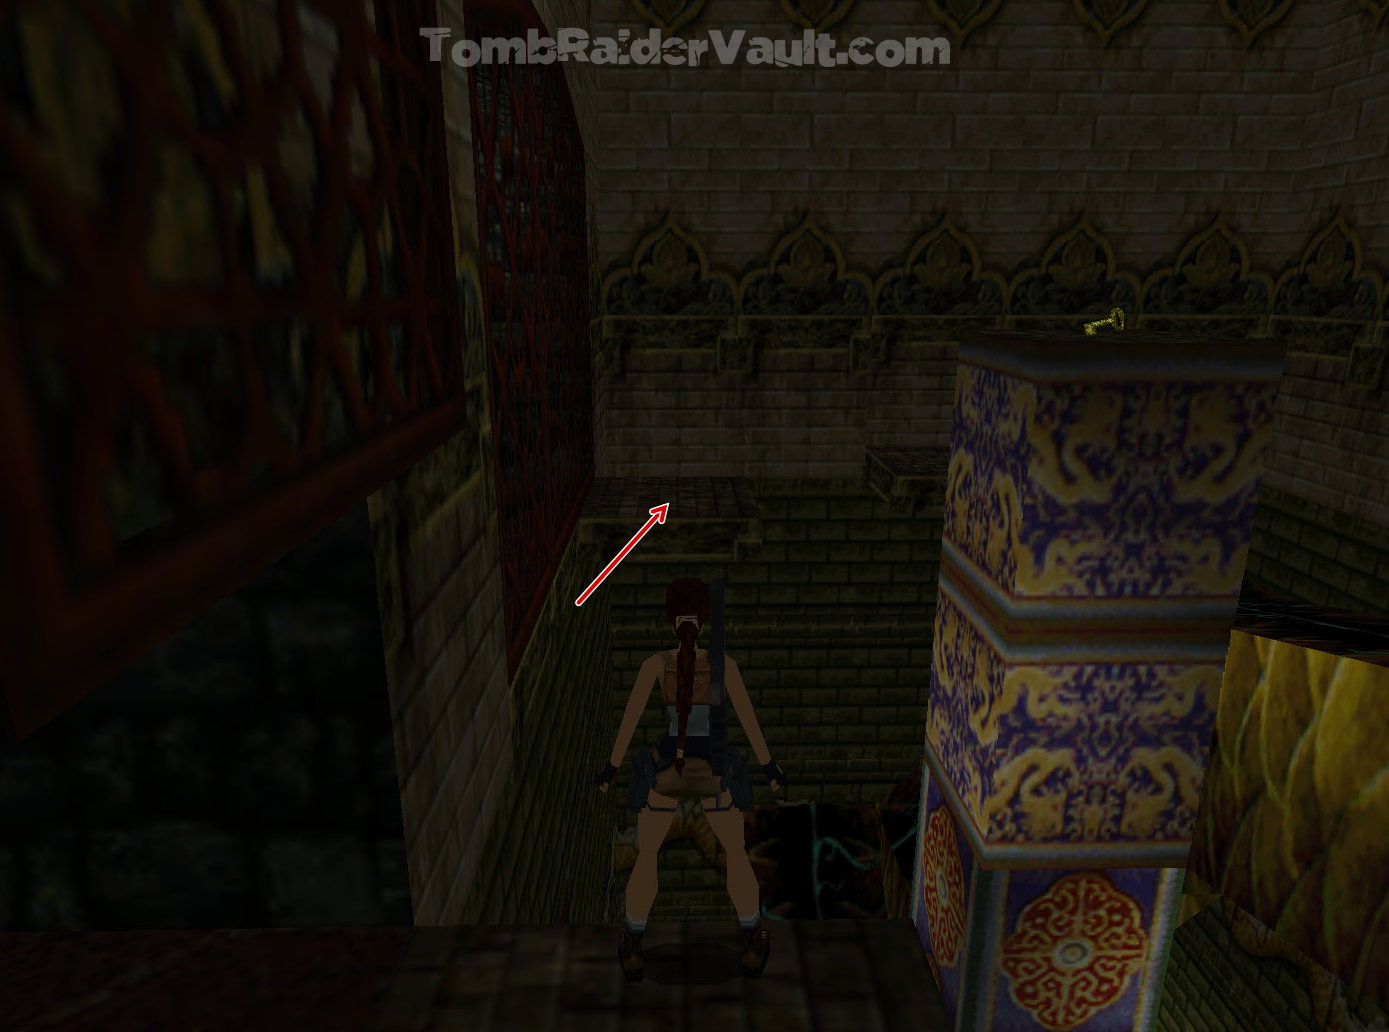
Slide down into the water and let the current pull you towards the gold key...pick it up and keep going until you emerge near the temple entrance. Swim back to the wooden platform from the beginning of the level and use the gold key to finally open the gates nearby. Swim through, turning right, then right again. Look out for another fish...you may want to use your harpoon gun to get it out of the way. Find the small medipack then pull a lever on the back of the first pillar, then swim around it, and then straight forward to another opening higher up.
Swim to find another wooden ledge and climb out to deal with another annoying killer fish. Turn around and be prepared to enter the dark spider cave! As you enter, a spider attacks, so deal with this one, and another spider that appears a bit further in. You should be able to see some flares on the floor, but as you approach two more creepy spiders will attack from a nearby web. Continue forward and get rid of another spider, plus a very angry mama spider! When she's down, find the Uzi clips to the right.
As you approach a room with a hanging egg sac, two more giant spiders will appear, so get rid of them whilst staying as mobile as possible. When they are dead, look for a low, brownish block that you can climb on next to one of the walls. It's possible another giant arachnid will appear down below. Climb up, turn left, run, jump and grab to the next one, roll, then jump and grab to the next and pull up. Run and jump diagonally left to a brown ledge. Before you jump to the next one, take a look to the right...you should be able to see another giant spider running around if you didn't see it earlier...use your M-16 or Uzis to get her from where you are.
As you jump to the next ledge, don't stay near the edge of it as another giant spider attacks and will push you off if you linger. Jump backwards onto the ledge you just came from to get her in safety. Jump back over, walk to the other end of the ledge, turn to face the egg sac, and run and jump to the block just below it and to the left (screenshot). Mind you don't bump into the egg sac or Lara will plummet to the ground and die! Run, jump and grab to the next one below the masks, then jump and grab to the passage opening ahead. Follow it until you are above the pool you just came from. Run, jump and grab to the block ahead and climb up to pick up the silver key.
Jump into the water and swim through the trapdoor on the bottom to make your way back to the temple. To the right of the beach is another door (screenshot), use the silver key to open it. Enter and climb up onto the first block, then face the next one (screenshot) so you can jump and grab the edge. Pull up, but immediately drop and grab the edge as a boulder rolls overhead. The same happens with the next one, so perform the same maneuvers. Pull up and pick up the automatic pistol clips from the alcove where the boulders rolled from.
Enter the opening next to the alcove. You are now on the bridge above the temple's entrance. There is a tiger at the other side that you may be able to reach from where you are. An eagle flies in from the right as you cross, so arm yourself! As you enter the room ahead, another tiger strikes from the left, so let him have it. Climb up onto the angled block in the far right corner, pull up and backflip onto the one behind (screenshot).
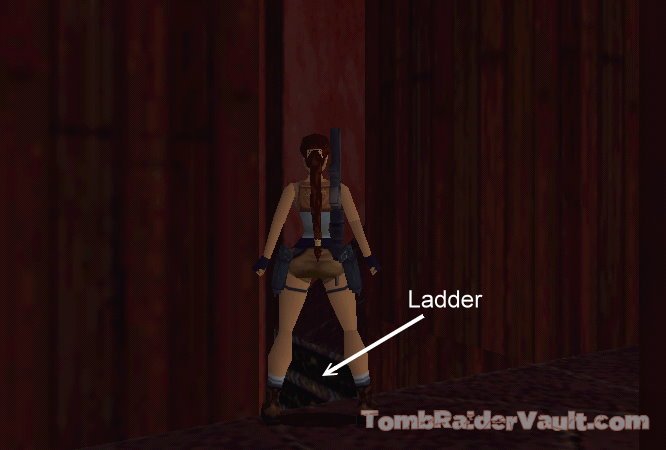
Jump to the ledge below the doorway, then climb up to it. Before you enter the room with the rolling blade, you will pass a doorway on the left wall. There is a ladder inside, so stand facing it (screenshot), jump across and press 'action' to grab the edge as you slide. Climb down the ladder, at the bottom let go, the press 'action' immediately to grab the ledge below. Pull up and pick up the Uzi clips. Follow the passage to make your way back to the rolling blade room again. (Note: If you don't need the ammo, you may want to skip this.)
To get past the blade, go to the far end of the room and stand with your back to the doorway you just entered. As the blade begins to roll away from that end, sideflip left twice to get to the upper ledge. Enter the next room...this also has a rolling blade, but it doesn't start moving, yet. Pick up the large medipack and the two sets of Uzi clips from beside the skeleton, then run across the bridge (this is when the blade begins to roll!) and veer off to the left at the end. Push the button there to open a door inside the temple somewhere, then roll and take out your weapons as another bird attacks from behind.
To get back over the bridge, you can either jump back into the water and go the long way around to get back to the room before the first rollng blade, or you are going to have to follow the rolling blade very closely as it rolls across the bridge. Once at the end, turn left quickly to avoid it on the return. Enter the room with the first rolling blade and jump over it diagonally to the doorway. When you exit, turn left, and you will see a series of springboards going up toward a ledge. Run and jump to the first one, and keep your 'up' button pressed so Lara jumps forward off each one...as she lands on the fourth one, press 'action' to soar upward and forward to land on the ledge above, then roll and draw weapons for another bird.
Jump to grab the opening ahead and pull up. Follow the path to a large lava chamber with two dragon statues. Walk to the edge of the path and jump across to the platform diagonally to the right with the keyhole in the wall next to it. Behind the next platform is a spiked wall that will begin moving towards you as soon as you step onto it. You need to get to the ladder at the other end, and to do this as quickly as possible, take a running jump onto the platform, run, then jump onto the block beneath the ladder, then jump up and grab the ladder to climb out of the way before the wall fills you with holes!
Climb up onto the next ledge, then up through the doorway. There is another spiked wall to the left, and it will start moving when you move towards the ladder on the far right wall over a pit. Line up with the ladder, then run towards it, jumping over the pit to grab the ladder. Climb up and pull up. Follow the right path past two closed gates, to find a lever. Pull it to lift up the nearest gate and go through it.
You are now in an area near the first dragon statue. You can see a key on top of the high platform in the middle. To get to it, turn left and run, jump and grab to the dark ledge in the corner (screenshot). Jump to the next one, then turn to jump and grab to the high platform and pick up the Main Chamber key. Hang and drop from the platform at the side of the dragon's body and drop down onto it. Drop onto the slope and you will slide down four of them...as soon as you reach the small one at the bottom, jump forward to land on the platform ahead. Drop down the next two platforms, then run and jump to the path in front of the doorway. This is not an easy jump, so you'll need to line yourself up precisely, facing between the door and the dragon, hop back from the edge, then take the run and jump.
From there, jump again to the platform with the keyhole and use it to open a trapdoor elsewhere. It also raises a grating on the wall behind. Jump back to the main path, then run and jump to the grating (screenshot). Pull up and jump to the platform beneath the ladder, or run and jump to grab the ladder, and climb up, dismounting to the right. Turn around and jump over the spikes to grab the next ladder. Climb up and pull up at the top.
Pass through the opening, and pass through the first open gate on the left. This area looks like the other one, but you are now in a room with the second dragon statue. Turn left, run, jump and grab to the next ledge, then jump across to the one beyond that one. Turn around and run and jump to the slope ahead, but keep your finger pressed on the 'jump' button to jump forward onto the dragon's body, just beside another ladder. Climb up through the trapdoor you opened and dismount on the left.
Ok, the reason you need to dismount here is so you can save your game. There is a series of jumps ahead, and it can be very frustrating. Jump and grab to the ladder you just came from. Climb up until you are about three rungs below the swinging blade. Jump backwards onto a slope, then jump forward to grab the next ladder. Climb this one until you are again under a blade, then jump back, pressing 'roll' almost at the same time to twist in the air, then press 'action' to grab the final ladder. Climb up, dismount to the right, and go through the opening to show a cut scene with Bartoli taking the Dagger of Xian and plunging it into his own heart! His goons carry him out, and Lara follows to end the level.
If you missed anything while playing the PC version, here is the savegame file with all kills, pickups and secrets.
¹ If you find yourself heavily timed, jumping as you run can save some time.
² The beauty of this game is that you can save it where you want, so if you find this section particularly difficult, save your game after each successful pass, then you won't have to pass them all again if you have to reload.
{ Previous Level } { Next Level }
Send us feedback about this wakthrough